29 June 2013

U-37 Returned to the Base at Wilhelmshaven


Image size: 1600 x 1025 pixel. 273 KB
Date: Sunday, 18 April 1943
Place: Wilhelmshaven, Niedersachsen, Germany
Photographer: Unknown

On 18 April 1943 the type IX boat U-37 returned to the base at Wilhelmshaven after its fourth patrol. On this mission, the boat had operated off Norway under Korvettenkapitän Werner Hartmann’s (11 December 1902 - 26 April 1903) command as part of Operation “Weserübung”. It hadn’t been as successful though, as during its previous patrols. Having sunk 8 ships on both the 2nd and 3rd sortie, it “only” flew three pennants on its periscope this time. The Viking cry “Westward-ho!”, adorning the conning tower, was adopted by Hartmann for his new boat U-198 that completed its first and only patrol under his command very successfully in 1943. It should be mentioned that Kapitänleutnant Asmus Nicolai Clausen (2 June 1911 - 16 May 1943), former 1st Watch Officer and later captain of the U-37, also used the “Westward-ho!” emblem on it and the other submarines commanded by him, namely U-129 and U-182.

Source:
"U-Boot Im Focus" magazine 2nd edition 2007
http://uboat.net/boats/u37.htm

U-125 Returning To Lorient


Image size: 1600 x 1025 pixel. 241 KB
Date: Friday, 6 November 1942
Place: Lorient, Brittany, France
Photographer: Unknown

Kapitänleutnant Ulrich Folkers (6 March 1915 - 6 May 1943) was one of the most successful commanders of the 2. Unterseebootsflotille (2nd Submarine Flotilla). Here he is seen returning to Lorient in U-125 on 6 November 1942 after his fifth patrol and more than three months at sea. Folkers sank six British ships during this sortie in his Type IX C boat. The extended patrol has caused the submarine’s paint to become very weathered. Note the windscreen on U-125’s conning tower, something normally seen only on torpedo boats! On the night of May 6 1943 the destroyer HMS Oribi located the U-125 in a heavy fog with its radar set just before 0300 and rammed her while doing something close to 20 knots. The boat was severely damaged and the British believed her to be sunk. But she did survive and at 0331 Folkers radioed BdU with an urgent request for help and U-552, U-381, U-413 and U-260 were ordered to assist him (U-614 and U-402 also in the area were told to remain on station). The boats searched for the wounded boat until the morning of the 7th. The corvette HMS Snowflake got a radar contact 0354 and soon the contact had closed to 100 meters! The starlights were turned on and revealed a heavily damaged U-boat and apparently already sinking. The corvette tried to ram but the boat escaped the turn. The crew of U-125 scuttled their boat with 5 explosive charges while almost alongside the HMS Snowflake and waited in the water to be rescued. Another corvette HMS Sunflower did reach the scene about this time. The commander of the corvette radioed the escort commander in HMS Tay but was given the shocking reply: "Not approved to pick up survivors". The corvettes HMS Sunflower and HMS Snowflake then turned towards the convoy leaving the men in the water. Kptlt. Folkers and his crew of 54 men died during that night!

Source:
"U-Boot Im Focus" magazine 2nd edition 2007
http://www.uboat.net/boats/u125.htm

22 June 2013

U-553 Returned From Successful Patrol


Image size: 1600 x 1126 pixel. 584 KB
Date: Saturday, 19 July 1941
Place: Saint-Nazaire, Loire-Atlantique, France
Photographer: Unknown

When U-553 returned to St. Nazaire from its second combat patrol on 19 July 1941, not only did it come home with two combat pennants, but a badly-damaged attack periscope as well! On 12 June 1941, after five days at sea, Kapitänleutnan Karl Thurmann (4 September 1909 - 20 January 1943) came upon stragglers from the westbound convoy OG-64 north of the Azores. at 0122 hours on the night of 12 June Thurmann sank the British steamer "Susan Maersk" (2,355 GRT). Because of the darkness and the speed with which the ship sank, less than a minute, only a rough tonnage estimate was posible, thus the gross registered tonnage on the sinking pennant is incorrect! At 1505 hours U-553 attacked the Norwegian tanker "Ranella" (5,590 GRT). A torpedo struck the ship, but it did not sink. A finishing shot was attempted at 1536, however the contact pistol failed. After the shot, Kapitänleutnant Thurmann turned away in the direction of the steamer, passing under the bow of the "Ranella", which was now stopped. The periscope, which was not fully lowered, struck the tanker and and the top two meters were bent backwards. Finally, at 1635 hours, a third torpedo struck its target, causing the ship to break into two parts. It still did not sink, however (read Lothar-Günther Buchheim "Die U-Boot Fahrer - Die Boote, die Besatzungen und ihr Admiral", page 160-161)! 100 rounds from the 88-mm deck gun were needed to finally sink the two parts of the wreck. The 29-man Norwegian crew had already left the ship and reached the Azores 12 days later.

Source:
"U-Boot Im Focus" edition no.2 - 2007

20 June 2013

Reichsbahn Personnel Wearing Camo


Image size: 1053 x 1600 pixel. 379 KB
Date: August 1944
Place: Verona, Veneto, Italy
Photographer: Walter Hollnagel

This particular photograph takes place somewhere at or around the bombarded railway staton at Verona (Italy) in August 1944 by a well-known German photographer, Walter Hollnagel. The man on the right is German DRB (Deutsche Reichsbahn) official whose wearing the edelweiss cap mixed with Reichswehr-Splittermuster 31 camo jacket (It's a particularly odd jacket, too, what with the collar, cuffs, buttons and full insignia of a regular railway tunic attached!). After the war, Hollnagel made many photographs related to the German railroad. This picture itself is an original color photograph (Hollnagel photographed often in color at the end of the war). The same individuals are pictured on page 395 of the Andreas Knipping / Richard Schulz book: "Die Deutsche Reichsbahn 1939-1945 Zwischen Ostfron und Atlantikwall". The book photo is in black and white and they are both standing in front of a Locomotive (not in front of the building like depicted above). BTW, if this tunic came on the market today, it would be derided as a fantasy item!

Source:
Askold photo collection
https://www.facebook.com/photo.php?fbid=609158262441981&set=gm.478184145603530&type=1&relevant_count=1&ref=nf
https://www.warrelics.eu/forum/cloth-headgear-3-reich/dont-tell-me-they-wouldnt-have-worn-it-146333-6/

The "Last Stand" Defender of Cherbourg


Image size: 1600 x 1308 pixel. 472 KB
Date: Tuesday, 27 June 1944
Place: Cherbourg-Octeville, Manche Department, Basse-Normandie, France
Photographer: Unknown

This dead young German Luftwaffe soldier wearing Zeltbahn M31 was one of the "last stand" defenders of German-held Cherbourg. Captain Earl J. Topley from St. Paul, Minnesota (left), who led one of the first outfits into the fallen city, blamed him for killing three of his men, until they got him with a grenade. France, 27 June 1944. The speed with which Cherbourg fell demoralised many German generals. Once the original landings had succeeded, and it became clear that the Allies were not going to be swept back into the seas, the Germans knew that they could only win if they could move reinforcements to the front quicker than the Allies. Like the Allies they underestimated how much could be done on the beaches, and believed that the capture of a major port was essential. As a result every major port was heavily fortified, but the fall of Cherbourg made it clear that even the best fortifications could be beaten, and quickly.

Source:
U.S. National Archives and Records Administration ARC Identifier: 531214
http://commons.wikimedia.org/wiki/File:Dead_German_soldier_in_Cherbourg.jpg

19 June 2013

Karl Dönitz Studying Maps at Kriegsmarine Headquarter


Image size: 1221 x 1600 pixel. 472 KB
Date: January 1943
Place: Marinehauptquartier Koralle, Berlin, Germany
Photographer: Walter Frentz

First published by "Signal" magazine February 1943 edition (to celebrate the new leader of the German Kriegsmarine), this picture (made by Walter Frentz) shows Generaladmiral Karl Dönitz (Befehlshaber der Unterseeboote) studying maps on a table (center) with Kapitänleutnant Adalbert Schnee (Geleitzugs-Asto, Admiralstabsoffizier beim Befehlshaber der Unterseeboote) at left and Kapitän zur See Eberhard Godt (Chef der Operationsabteilung beim Befehlshaber der U-Boote). The briefing held at the U-Boat operations section of the Kriegsmarine HQ in Berlin (Marinehauptquartier Koralle). On 30 January 1943, Dönitz replaced Erich Raeder as Commander-in-Chief of the Navy (Oberbefehlshaber der Kriegsmarine) and Grand Admiral (Großadmiral) of the Naval High Command (Oberkommando der Marine). His deputy, Eberhard Godt, took over the operational command of the U-boat force.

Source:
https://en.wikipedia.org/wiki/Karl_D%C3%B6nitz
https://www.ullsteinbild.de/ullstein-webshop/detail_print.html?id=4662786&ref=workbench

Adolf Hitler and Hermann Göring at the Demonstration of Hetzer


Image size: 1138 x 1600 pixel. 698 KB
Date: Thursday, 20 April 1944
Place: Near Schloss Klessheim, Wals-Siezenheim, Austria
Photographer: Walter Frentz

Adolf Hitler (Führer und Reichskanzler; Oberbefehlshaber der Wehrmacht; Oberbefehlshaber des Heeres) and Reichsmarschall Hermann Göring (Oberbefehlshaber der deutschen Luftwaffe) at the demonstration of the newly developed Hetzer tank destroyer at a closed highway near Klessheim Palace (Schloss Klessheim), west of Salzburg (Austria), on the occasion of Adolf Hitler's 55th birthday, 20 April 1944. In the left behind Hitler wearing ledermantel (leather jacket) is General der Flieger Karl-Heinrich Bodenschatz (Chef des Ministeramts im Reichsluftfahrtministerium und gleichzeitig Verbindungsoffizier Görings zu Hitler), while in the far left (face cropped) is Generalfeldmarschall Wilhelm Keitel (Chef des Oberkommandos der Wehrmacht). Last, the man wearing black hat behind Göring is Dr. Ferdinand Porsche (Austrian-German automotive engineer).

Source:
http://www.ww2shots.com/gallery/v/People/Adolf+Hitler/Hitler+und+Hermann+G_ring-color+photo-ww2shots-people.jpg.html

M4 Sherman stuck in Okinawa Stream


Image size: 1300 x 1600 pixel. 787 KB
Date: Monday, 21 May 1945
Place: Wana Draw, Okinawa, Japan
Photographer: Alexander Roberts

M4A3 Sherman of the 706th Tank Battalion attached to the US Army's 77th Infantry Division, Tenth Army, stuck crossing a 5-foot stream. Other Shermans are behind it. Both the Americans and the Japanese could not maneuver in a constant torrential downpour known locally as the "Plum Rains." The tank commander looks on as the driver bales the tank out. Note "Pop" written on the driver's helmet. The tank would have to wait until a tractor could be available to pull it out. The 706th fought at Guam, Leyte, Ie Shima, Okinawa, and was back at Luzon in the Phillipines at the end of the war. 

Source:
http://www.worldwar2database.com/gallery3/index.php/wwii1055

A Marine Artillery Observer on Iwo Jima


Image size: 1600 x 1286 pixel. 408 KB
Date: Tuesday, 20 February 1945
Place: Iwo Jima, Bonins, Japan
Photographer: Dreyfuss

Private First Class Alvin C. Dunlap, 5th Marine Division, 27th Marine Regiment, directs mortars and artillery against Japanese positions. He is an observer who spotted a machine gun nest finds its location on a map so they can send the information to artillery or mortars to wipe out the position. Note his sheathed KA-BAR knife on his web belt! The World War II battle to take the Japanese Island of Iwo Jima (US Operation Displacement) from the heavily entranced and fortified hard fighting Japanese Army was one of the Marines greatest and bloodiest battles in the Pacific Theater. It is the only battle that the US casualties exceeded the Japanese casualties; 1/3 of all the Marines killed in the Pacific died at Iwo Jima and most of the Japanese soldiers fought to their deaths! It was the beginning of the end of World War II for the Empire of Japan. Occupying Iwo Jima with it's three landing strips allowed allied forces to bomb Tokyo Japan which was only a little over 600 miles to the North and eventually pound the Japanese into submission.

Source:
http://www.crazywebsite.com/pg-Funny-Pictures/Vintage_Public_Domain_Images_WWII_Combat_Photos_Battle_Iwo_Jima-1.html
http://www.ww2incolor.com/news/tag/world-war-2-photos

Platoon of 4th Marine Division Briefed on Iwo Jima on Attack Transport


Image size: 1600 x 1291 pixel. 616 KB
Date: Sunday, 18 February 1945
Place: Enroute to Iwo Jima, Bonins, Japan
Photographer: Morejohn

Lieutenant Wade briefs 4th Marine Division platoon about landing on Blue or Yellow beaches on D-Day. Note relief map behind him and maps of the Pacific. The 4th Marine Division was designated Landing Group Baker (Task Group 56.2.2). Transported to Iwo Jima by Transport Squadron 15 (Task Group 53.2) under the command of Commodore H.C. Flanagan. Transport Squardon 15 consisted of ten attack transports (APAs); four attack cargo ships (AKAs) and one vehicle landing ship (LSV) just for the 4th Marine Division alone. After the battle, the number of unwounded Marines for the entire operation only required eight transport ships!

Source:
NARA (National Archives) FILE #: 127-G-142484
http://commons.wikimedia.org/wiki/File:Lieutenant_Wade_discusses_overall_importance_of_target_at_pre-invasion_briefing_HD-SN-99-02874.jpg
http://www.worldwar2database.com/gallery3/index.php/wwii1053

Tiger Commander of Schwere Panzer-Abteilung 503 Confers With "Totenkopf" Panzergrenadiers


Image size: 1600 x 1152 pixel. 723 KB
Date: Friday, 13 August 1943
Place: Khruschevo, Nikitovka Line, Belogrod Oblast, Soviet Union
Photographer: SS-Kriegsberichter Willi Merz

In most publication (also on the internet), this famous picture (which was taken by SS-Kriegsberichter Willi Merz) always attributed to the German offensive in the Kursk battle (5-16 July 1943), but actually it is AFTER that (the Soviet counterattack, 12 July-23 August 1943). It shows Panzerkampfwagen VI Tiger I ausf.E (Sd.Kfz.181) Turmnummer (Turret Number) 313, 3.Kompanie, 1.Zug (Platoon) 3rd Vehicle, leads another Tiger of Schwere Panzer Abteilung (Heavy Tank Battalion) 503 that has stopped to confer with panzergrenadiers of III.Bataillon/SS-Panzergrenadier-Regiment 6 "Theodor Eicke"/3.SS-Panzergrenadier-Division "Totenkopf" (Death's Head) as they attack during a commanders' roll-call, ironing out the details of co-operation during the advance along the Khruschevo - Nikitovka Line, August 13, 1943 (part of the Battle of Belogrod on August 13-14, 1943). The Panzergrenadiers are wearing the distinctive SS camouflage smocks, the Tarnschlumpfjacke. Note that the one in the center has a matching pair of trousers. Note also the type of improvised turret stowage bin, distinctive for the s.Pz.Abt.503! After the failure of Operation Zitadelle (Citadel) to take the city of Kursk in July 1943, substantially reduced German divisions withdrew to their previous positions around the town of Belogrod. Schwere Panzer Abteilung 503, over the commander's protests, was ordered to attach its three companies to three SS Panzergrenadier Divisions. This had the effect of blunting the Tiger force available and left the tanks without mutual armored support. Outnumbered ten to one, the Tigers, Panzers and Sturmgeschütz assault guns used their superior training and tactics, and the heavy armor of the Tigers, to assist Totenkopf's drive on the Merla River to link up with elements of the 4. Panzerarmee. Despite forcing the Germans to withdraw from Belogrod on August 6, the heavy Soviet tank losses prevented the total destruction of the German forces. Between July 5 and August 7, 1943, schwere Panzer-Abteilung 503 claimed to have destroyed 385 tanks, 4 assault guns, and 265 antitank guns. On August 13 alone, Tiger 332 knocked out three T-34 medium tanks, two KV-1 medium tanks, one SU-122 assault gun and five antitank guns! The Battalion lost one tank and Leutnant Konrad Weinert was wounded.

Source:
Book "PzKpfw V Tiger vol.II" by Tadeusz Melleman
http://www.worldwar2database.com/gallery3/index.php/wwii0160

18 June 2013

Defendants in the Beer Hall Putsch trial


Image size: 1600 x 1075 pixel. 369 KB
Date: Tuesday, 1 April 1924
Place: München, Bayern/Bavaria, Germany
Photographer: Heinrich Hoffmann

The participants of the ill-fated Nazi Münich Putsch (better known as Beer Hall Putsch) posed together for the camera as defendants during the Ludendorff-Hitler trial – April 1, 1924. From left to right: Oberleutnant Heinz Pernet (5 September 1896 - 30 June 1973), Dr. Friedrich Weber (30 January 1892 - 19 July 1955), Dr. Wilhelm Frick (12 March 1877 – 16 October 1946), Oberstleutnant Hermann Kriebel (20 January 1876 - 16 February 1941), General der Infanterie a.D. Erich Ludendorff (9 April 1865 - 20 December 1937), Adolf Hitler (20 April 1889 - 30 April 1945), Oberleutnant der Reserve Wilhelm Brückner (11 December 1884 - 18 August 1954), Ernst Röhm (28 November 1887 – 2 July 1934), and Robert Wagner (13 October 1895 - 14 August 1946). Note that only two of the defendants (Hitler and Frick) were dressed in civilian clothing. Also, Kriebel and Ludendorff wearing pickelhaube (spiked German helmet). BTW, Pernet was Erich Ludendorff's stepson. The Beer Hall Putsch was a failed attempt at revolution that occurred between the evening of 8 November and the early afternoon of 9 November 1923, when Nazi Party leader Adolf Hitler, Generalquartiermeister Erich Ludendorff, and other heads of the Kampfbund unsuccessfully attempted to seize power in Münich.

Source:
Bundesarchiv Bild 102-00344A
http://en.wikipedia.org/wiki/Beer_Hall_Putsch

17 June 2013

3rd Marine Division Searches Agana for Japanese Survivors


Image size: 1600 x 1292 pixel. 707 KB
Date: Monday, 31 July 1944
Place: Agana, Guam, Mariana Islands
Photographer: USMC Corporal J.F. Andrejka

American Marine searches Agana for Japanese holdouts after its capture. The capital of Guam, Agana, was heavily shelled and bombed during the liberation of the island from the Japanese. US Marines spent July 29-30, 1944, in resting, reorganizing, and preparing for the coming attack. During this rest on Fonte Plateau the men witnessed one of the most unusual sights of the Pacific War. Decked in full combat regalia, Japanese marching in the town square made an impressive sight. Forward observers quickly called for an artillery concentration, but it fell too late to hit the formation that dispersed as rapidly as it had appeared. The III Corps launched its attack to seize the northern portion of Guam, starting with Agana, at 0630 Hours on July 31, 1944. On the left the 3rd Marine Division, 3rd Regiment under US Marine Colonel James A. Stuart moved out with three battalions abreast. The 3rd Battalion, along the coast highway, headed generally north to Agana. Little opposition met the forward movement of Colonel Stuart's forces. Although the thickly mined roads into Agana caused some casualties, Marines were in the Plaza of the former capital by 1045 Hours. The enemy did not defend the razed town, and the only Japanese encountered were wounded. After the capture of the capital, about 1500 the 3rd Marines sent its 3rd Battalion along the coast road north of Agana. As part of Guam's postwar reconstruction plan, the U.S. Navy constructed new straight city streets that passed through existing lots and created many plots of land with multiple owners. This has hindered the development of the city to the present day!

Source:
http://www.worldwar2database.com/gallery3/index.php/wwii1052

155mm "Long Tom" Fires at Japanese on Guam


Image size: 1279 x 1600 pixel. 478 KB
Date: Thursday, 3 August 1944
Place: Finegayan, Guam, Mariana Islands
Photographer: USMC Corporal A.F. Hager

III Corps Artillery of the 7th Marine 155mm Gun Battalion "Long Tom" M1 firing during the night of August 2-3, 1944, during operations to liberate the town of Finegayan. Commanded by Lieutenant Colonel John S. Twitchell; Executive Officer Major Dale H. Heely. 7th Battalion's "Long Toms" were initially set up in the open 500 yards from White Beach 2. The positions were in the shadow of the mountain range secured by the 4th Marines and the Army's 305th Infantry after heavy fighting. At the start of the campaign, enemy opposition might be fierce enough to contain the beachheads and prevent the planned link-up on the Force Beachhead Line, where 3rd Marine Division and 1st Provisional Marine Brigade would protect the beachhead. Successful employment of corps artillery presented a problem. The minimum effective range of the powerful 155mm guns and howitzers was so great that they might be limited to deep support missions should the assault move slowly. To meet this contingency, US Army Brigadier General Pedro A. del Valle and his newly-formed artillery staff planned to land two 155mm battalions in the south behind the brigade. This would permit the heavier guns of the 7th 155mm Gun Battalion, with only long range capabilities, to reinforce the fires of the 12th Marines in support of the 3d Division. All artillery battalions of the 12th Marines had displaced forward by 2 August in order to be in position to provide continuous support to regiments of the division. Corps artillery had also moved, so that its longer range guns could now be used more effectively. By nightfall, units had brought forward a good supply of ammunition in anticipation of the increased need for artillery support in the Finegayan area. During the night 2-3 August, the 12th Marines delivered 777 rounds of harassing and interdictory fires on roads and trails within the division's zone of action. On August 9, investigation showed that a Saipanese civilian report of 2,000-3,000 Japanese located in the northern cliff area had caused a sudden halt in the American advance. Corps artillery was notified to place all fire possible in that region. With the 7th 155mm Gun Battalion being the only corps unit that could reach the suspected enemy concentration, it received orders to cover the densely forested terrain. In two and a half hours of uninterrupted firing, the 7th hurled an unprecedented 1,000 rounds into the area from the 12 guns of its battalion. Division artillery batteries added 2,280 75mm and 105mm shells to the same target. No resistance met the 9th Marines when it moved in, but neither were there many Japanese bodies. As the Corps Artillery A-3 later wrote: "The intelligence information on which all the firing had been based was wrong, and we had made this great effort for nothing. However, it did provide a bang-up end to the campaign." The M1 155 gun has a range of 14.4 miles (23,221 meters) and can fire 6-inch shells at the sustained rate of 40 per hour. 

Source:
http://www.worldwar2database.com/gallery3/index.php/wwii1051

US Army 43rd Infantry Division, 172nd Regiment Lands on Rendova


Image size: 1600 x 1290 pixel. 792 KB
Date: Wednesday, 30 June 1943
Place: Rendova, New Georgia, Solomon Islands
Photographer: Major Robert Jacquot

The XIV Corps Western Force's 43rd Infantry Division, 172nd Infantry Regiment began landing on Rendova at 0700 Hours. The man looking toward the camera is Wilbur O. Root. He was Company A, 43rd Infantry Division of the 172nd Vermont Regiment. As per 11 July 2011, he is 89 years old living in Upstate New York. Wikipedia said that the man in question is Army Private First Class Clayton Sholes, but this is wrong (claims of other individuals in this picture have yet to be proven). He was 1st Scout, Company B, 172 Batalion, 43rd Division, United States Army. Two months after this photo was taken, he was wounded by shrapnel on Munda (New Georgia) and subsequently evacuated to Auckland, New Zealand. Clayton Sholes died at the age of 93 in August of 2012. He lived in the town of Ada, northwestern Minnesota, for most of his life except his service in the United States Army. The image of himself looking toward the camera was confirmed by him numerous times in his life including details of WHO took the picture, which was a Navy photographer. This image, which is now widely circulated on the internet was searched for, and found in 1994 (pre-internet) at the National Archives by his grandson. The archivist who helped his grandson find the image told him the orignal negative hadn't been viewed for thirty years. She also confirmed that the person who took the photograph was a Navy photographer because of the way it was catalogued at the National Archives. Source: Clayton Sholes, Grandson Jon Van Amber. Now back to the story! There was confusion and disorganization, but the 172nd quickly overwhelmed a 120-man Japanese detachment and established a 1,000-yard-deep beachhead. All troops were ashore in half an hour. Moving supplies ashore and inland quickly became the main problem. As rain turned the ground into red clay mud, heavy traffic ruined the island's single mile-long road, making it so muddy that a bulldozer sank! Inadequately marked supplies, dumped on the beach by troops wading ashore, piled up and became intermixed. So many trucks became mired in the mud that US Army Major General John H. Hester, the New Georgia Occupation Force (NGOF) commander, had to stop their shipment to the beachhead, and movement of supplies off the beach became slow and laborious. The Rendova landing surprised the Japanese commanders on Munda and Rabaul, who had no counterattack force ready. Artillery fire from Japanese batteries on Munda, therefore, was the only Japanese response until late morning, when air attacks began. Three air attacks on June 30 damaged only US Navy Rear Admiral Richmond Kelly Turner's flagship, the transport USS McCawley (AP-10), which was accidentally torpedoed and sunk by American PT boats later that evening. A Japanese air strike against Rendova two days later killed 30 men, wounded more than 200, and exploded fuel dumps. An attempted encore performance on July 4, however, provided the Americans with more gratifying fireworks. Sixteen Japanese bombers appeared unescorted. A mere eighty-eight rounds of antiaircraft fire brought down twelve, and waiting fighters shot down the rest. Reinforcements, the majority splashing ashore on Rendova, continued to disembark at all four beachheads until July 5, when virtually the entire NGOF was assembled. The first phase of Operation "Toenails" had succeeded. 

Source:
NARA (National Archives) FILE #: 080-G-52573---WAR & CONFLICT BOOK #: 1176--- original filename is HD-SN-99-02835.JPEG
http://commons.wikimedia.org/wiki/File:American_forces_landing_at_Rendova_Island.JPEG
http://www.worldwar2database.com/gallery3/index.php/wwii1050

16 June 2013

General Wilhelm Ritter von Thoma Surrender to Bernard Montgomery


Image size: 1600 x 1304 pixel. 513 KB
Date: Wednesday, 4 November 1942
Place: Tel el Mampsra, El Alamein, Egypt
Photographer: Unknown

General der Panzertruppe Wilhelm Ritter von Thoma (Kommandierender General Deutsche Afrika Korps) saluting his captor following his surrender to Lieutenant-General Bernard Montgomery (Commander of the British Eighth Army). On 4 November 1942, von Thoma was captured by the British at the hill of Tel el Mampsra, west of El Alamein, Egypt. With his tank hit several times and on fire, von Thoma dismounted and stood quietly amongst a sea of burning tanks and the German dead scattered around the small hill where he was taken prisoner by Captain Grant Allen Singer of the 10th Royal Hussars (Prince of Wales's Own), nickname "Bakers Light Bobs". Rommel later opined that von Thoma was probably seeking his death in battle while other staff officers quietly speculated that he went to the front to deliberately surrender, though there is really no evidence on this point one way or the other (Von Thoma was captured following his command of the defence of a hill feature in which his force was reduced to a collection of smouldering scrap). Back to the picture: glum though they look, it appears that in the same evening Monty and von Thoma went on to enjoy dinner together at Monty headquarters and discuss the battle.  B.H. Liddell Hart later recorded Von Thoma's shocked reaction to Montgomery's level of knowledge of the German situation and dispositions (derived, no doubt, from Ultra intercepts!): "I was staggered at the exactness of his knowledge… He seemed to know as much about our position as I did myself." Von Thoma was then taken to the Pyramids of Giza by his captors when he expressed regret that he would leave Egypt without seeing them. British Prime Minister Winston Churchill - who apparently developed a great respect for Von Thoma during his period of captivity - is said to have commented, "I sympathise with General von Thoma... Defeated, in captivity, and dinner with Montgomery !" BTW, the captor of Von Thoma, Captain Singer (born in 1915), would died in the following day (5 November 1942) during the Second Battle of El Alamein (read the news HERE).

Source:
http://en.wikipedia.org/wiki/Wilhelm_Ritter_von_Thoma
http://www.stanford.edu/group/auden/cgi-bin/auden/individual.php?pid=I4181&ged=auden-bicknell.ged&view=preview
http://ww2gravestone.com/general/thoma-wilhelm-ritter-von
http://www.ww2incolor.com/german/vonthomamonty.html


US Sailors Work on a Submarine


Image size: 1341 x 1600 pixel. 513 KB
Date: Tuesday, 1 May 1945
Place: Pearl Harbor, Hawaii, United States
Photographer: Lieutenant Commander Horace Bristol

The National Archives original caption is "Enlisted men repair and check instruments aboard a submarine just returned to Pearl Harbor, Hawaii. May 1945." A Balao or Gato Class submarine, it might possibly be the Finback (SS-230), Halibut (SS-232), Kingfish (SS-234), Silversides (SS-236) or Whale (SS-239). All of them were at Pearl Harbor sometime during May 1945. The black "23" was not common on U.S. submarines engaged in combat during World War II. No number identification was used on submarines on war patrol. It's possible the photo was staged. Note: Many of the captions of Bristol's photography are lacking in details and some have the wrong dates, places and locations. The "23" boat in question in this photo is definitely NOT the S-23 (SS-128). It is beyond a doubt a Salmon or Gato/Balao class fleet boat, and I would lean toward a Balao. The date of the photo is probably early to mid 1944. The boat in question has the characteristicly fat, twin periscope shears and long, wide flat "cigarette" deck of a Balao. Directly above the head of the sailor who is working at the base of the aft scope is a radar mast. The sailor behind him is standing at and looking through the aft Target Bearing Transmitter (TBT). Barely visible on the far left of the photo is what I believe to be part of a 20 mm gun mount. None of these features were ever present on any of the S-boats, even the later 40 series that were heavily modified (i.e. S-45 (SS-156) ) towards the end of the war. The whole conning tower fairwater on the boat in question is simply too large for a S-boat. As for the "23" on the fairwater, I have seen wartime photos of fleet boats displaying mysterious one and two digit numbers that do not correspond to their hull number (see the Guardfish (SS-217) and Peto (SS-265) pages for examples). Despite a lot of research, I have not turned up an official explanation for these strange numbers. One source said that they were squadron or flotilla identifiers, but I can't back this up officially. It is possible that they were temporary numbers assigned while the boats were in home waters, maybe to cut down on friendly fire incidents. Strangely enough, these numbers also seemed to have been used briefly during WWI, as I have seen them on D, E, F, G, and H-class boats. It is also entirely possible that these numbers are part of an official disinformation program designed to obscure the identities of the boats while allowing a wide distribution of photos to an information hungry wartime public. That would also account for the information inaccuracies attributed to otherwise highly thought of photographers. Riveted construction on the conning tower fairwaters of the fleet boats was far more common than I previously thought. It seems that the fairwater plating was riveted to the supporting structure underneath during construction on virtually all of the fleet boats, no matter who built it. This was possible due to the fact that the fairwater was non-watertight and merely provided for a smooth flow of water around the conning tower and lower periscope shears. Riveting was a long practiced and well known construction method, while welding was still relatively new and there was a fairly low number of skilled and experienced welders, and they had to be parceled out carefully depending on priority. All of the pressure resisting elements such as the conning tower and the main pressure hull were welded. The last fleet boat to have a riveted pressure hull was the Pompano (SS-181) in 1937. These original riveted fairwaters were retained until the end of the war, unless the boat had major rework of the fairwater performed (like most of the Gato's), or if the boat suffered battle damage. The rework jobs seemed to have been mostly welded.

Source:
National Archives Record Administration (NARA) photo # 080-G-468179 & HD-SN-99-02504
http://www.navsource.org/archives/08/08369.htm
http://www.worldwar2database.com/gallery3/index.php/wwii1030

Coast Guard LST Follows LCIs to Cape Sansapor


Image size: 1600 x 1253 pixel. 774 KB
Date: Saturday, 29 July 1944
Place: Cape Sansapor, Vogelkop Peninsula, New Guinea
Photographer: Photographer's Mate First Class Harry R. Watson

At the end of July 1944, US Army General Douglas MacArthur sent an amphibious expeditionary force to Cape Sansapor, New Guinea. By doing so he made a 200-mile jump from his previous most advanced position. The Coast Guard-manned LSTs 18, 22, 26, 66, 67, 68, 170, 202, 204 and 206 all took part in the landings and the follow-up activity. The Coast Guard-manned frigates Bisbee, Coronado, Eugene, Gallup, Glendale, Long Beach, San Pedro and Van Buren performed offshore patrols during the landings. MacArthur's planners sped up the operations in New Guinea, bypassing Japanese strongholds. Cape Sansapor was selected because of its ability to support Tank Landing Ships (LSTs). Here elements of the US Army's 6th Infantry Division, their anti-aircraft guns manned in case of air attack, follow in the wake of Infantry Landing Craft (LCIs) to the Vogelkop Peninsula. 

Source:
NARA (National Archives) Record Group 26: Records of the U.S. Coast Guard, 1785 - 2005 (ARC identifier: 355). Series: Activities, Facilities, and Personalities, compiled 1886 - 1967 (ARC identifier: 513164). NAIL Control Number: NWDNS-26-G-2839
http://commons.wikimedia.org/wiki/File:Columns_of_troop-packed_LCIs_trail_in_the_wake_of_a_Coast_Guard-manned_LST_en_route_for_the_invasion_of_Cape..._-_NARA_-_513184.tif
http://www.worldwar2database.com/gallery3/index.php/wwii1049

15 June 2013

German SS Prisoners at Arnhem


Image size: 1600 x 1177 pixel. 509 KB
Date: Monday, 18 September 1944
Place: Arnhem, Gelderland, Netherlands
Photographer: Sergeant D.M. Smith

Four of the five prisoners of the SS-Panzer-Aufklärungs-Abteilung 9/9.SS-Panzer-Division "Hohenstaufen" (one is a seventeen years old. All of them are wearing the pea dot 44 camouflage pattern (SS-Erbsenmuster) that were peculiar to the Waffen SS) shortly before being handed over to the Military Police, captured during Viktor Graebner's ill-fated attempt to rush through the British defences around Arnhem Bridge on the morning of Monday, 18th September 1944. The three guards in the background are glider pilots (!), from left to right, Staff Sergeants Joe Kitchener, "Duffy" Edwards, and George Milburn. Upon arriving in the Arnhem area, the 9th SS Division began the task of refitting. The majority of the remaining armoured vehicles were loaded onto trains in preparation for transport to repair depots in Germany. On Sunday, 17 September 1944, the Allies launched Operation Market-Garden, and the division would become heavily involved in the subsequent Battle of Arnhem. The British 1st Airborne Division was dropped in Oosterbeek, to the west of Arnhem. Realizing the threat, SS-Obergruppenführer und General der Waffen-SS Wilhelm "Willi" Bittrich (commander of the II. SS-Panzerkorps) ordered 9.SS-Panzer-Division "Hohenstaufen" (led by SS-Oberführer Walter Harzer) and 10.SS-Panzer-Division "Frundsberg" (led by SS-Brigadeführer und Generalmajor der Waffen-SS Heinz Harmel) to ready themselves for combat. The division's armour was unloaded from the trains and workshop units worked frantically to replace the tanks tracks, which had been removed for transportation. Of the division's armored units, only the division's reconnaissance battalion; equipped mostly with wheeled and half tracked vehicles, was ready for immediate action. Bittrich ordered "Hohenstaufen" to occupy Arnhem and secure the vital Arnhem Bridge. Harzer sent the division to the city, encountering stiff resistance from the "Roten Teufel" (Red Devils), as the Germans came to call the British paratoopers. The Reconnaissance Battalion, a 40-vehicle unit commanded by Hauptsturmführer Viktor Eberhard Gräbner, was sent south over the bridge to scout the area around Nijmegen. Gräbner had that day received the Ritterkreuz des Eisernen Kreuzes (Knight's Cross of the Iron Cross) for his actions in Normandy. While the Reconnaissance Battalion was scouting to the south of Arnhem, Colonel John Frost's 2nd Battalion of the British 1st Airborne Division had advanced into Arnhem and prepared defensive positions at the northern end of the bridge. Gräbner returned from his scouting mission to the south on the morning of 18 September, and ordered about half of his reconnaissance unit, numbering about 22 armored cars, half-tracks, and a few trucks, to attack north across the bridge. Gräbner's exact intentions remain a mystery, but he apparently either hoped to recapture the bridge or to race through the British defences to assist the rest of the division in its defence of Arnhem. Either way, the attack was a complete disaster. The Paras were ready, and after allowing the first four vehicles to pass, they opened up with PIAT anti-tank launchers, flamethrowers and small arms fire. In two hours of fighting, the Reconnaissance Battalion was virtually annihilated, losing 12 vehicles out of 22 in the assault and around 70 men killed, including Gräbner. This action is depicted in the film "A Bridge Too Far". Throughout the eight-day battle, the division operated mostly in and to the west of Arnhem, fighting with Frost's battalion and reducing the pocket containing the remainder of the 1st Airborne, which had become encircled near Oosterbeek. The battle of Arnhem was a victory for Hohenstaufen. With the assistance of other German units, the division had destroyed an elite British airborne unit, which was badly outnumbered and only lightly armed. Despite the intensity of the fighting, the soldiers of Hohenstaufen and Frundsberg treated the captured paratroopers courteously, although there are reports of cold-blooded executions by some SS members, and Bittrich remarked that the tenacity and fighting prowess of the Red Devils was not to be matched, even by the Soviets!

Source:
http://commons.wikimedia.org/wiki/File:Waffen_SS_snipers.jpg
http://www.iwm.org.uk/collections/item/object/205192037
http://www.pegasusarchive.org/arnhem/Photos/PIcSSPow.htm

Captured Foreign Volunteers in the German Army


Image size: 1600 x 1543 pixel. 510 KB
Date: Thursday, 15 June 1944
Place: Normandy, France
Photographer: Bert Brandt

Original caption: "They fought for Hitler. Somewhere in France – Not all of the German Army prisoners taken on the battlefields of France are stalwart, blonde Aryans who were born to rule the world. Not quite so exclusive these days, the 'Herrenvolk' is hob-nobbing with men of all races—anyone, as a matter of fact, who can carry a gun for Adolf. Among the prisoners captured in France were: (left to right) front row: a Yugoslav; an Italian; a Turk; a Pole; (back row) a German; a Czech; a Russian who was forced into the army when the Nazis occupied his town; and a Mongol!"

Source:
http://www.arkmilitaryheritage.com/exhibits/wwii/Gallery127.htm

B-24D Liberator of 308th Bomb Group Passes P-40Ks of 23rd Fighter Group


Image size: 1600 x 1097 pixel. 429 KB
Date: Wednesday, 10 February 1943
Place: Kunming, Yunnan, China
Photographer: Unknown

Consolidated B-24D-25-CO Liberator of 308th Bomb Group passes P-40K Warhawks of 23rd Fighter Group on its way to attack Japanese targets. Both groups were part of the 14th Air Force, created from the American Volunteer Group, the famed "Flying Tigers" under Brigadier General Claire L. Chennault on March 10, 1943. In his memoirs, Chennault praised the 308th: "They took the heaviest combat losses of any Group in China and often broke my heart by burning thousands of gallons of gas only to dump their bombs in rice paddy mud far from the target. However, their bombing of Vinh railroad shops in Indo-China, the Kowloon and Kai Tak docks at Hong Kong, and the shipping off Saigon were superb jobs unmatched anywhere. When the Army Air Force Headquarters in Washington tallied the bombing accuracy of every bomb group in combat, I was astonished to find that the 308th led them all." Before the 23d Fighter Group returned to the United States in December 1945, it accounted for the destruction of 621 enemy planes in air combat, plus 320 more on the ground. It sank more than 131,000 tons of enemy shipping and damaged another 250,000 tons. It caused an estimated enemy troop loss of more than 20,000. These statistics were compiled through a total of more than 24,000 combat sorties, requiring more than 53,000 flying hours, and at a cost of 110 aircraft lost in aerial combat, 90 shot down by surface defenses and 28 bombed while on the ground. Photo taken sometime between February 10 and September 1943. 

Source:
NARA (National Archives) Identifier 535780.
https://commons.wikimedia.org/wiki/File:Liberator_bomber_crosses_the_P-40_fighter_planes.jpg
http://www.worldwar2database.com/gallery3/index.php/wwii1048

14 June 2013

Marines at General Quarters, Dutch Harbor, Alaska


Image size: 1600 x 1276 pixel. 567 KB
Date: Wednesday, 3 June 1942
Place: Dutch Harbor, Aleutians, Alaska, United States
Photographer: Unknown

Aided by the first clear weather in three days, the Japanese attacked Dutch Harbor on the morning of June 3, 1942 almost simultaneously with their attack on Midway. The Naval Air Station had gone to General Quarters at 0430 Hours in accordance with daily routine. At 0545, while battle stations were still fully manned, a flight of about 15 A6M2 Zero-Sen fighters appeared and opened fire. After a single flight over the station, during which they did very little damage, the planes moved off to the northward. At about 0550 four B5N2 "Kate" bombers approached. Five minutes later they released 16 bombs. Two dropped into the water, but 14 fell in the congested area of Fort Mears. Two barracks and three Quonset huts were destroyed and several buildings were damaged by the hits and resulting fire. Approximately 25 men were killed and about the same number wounded. A second flight of three bombers overshot Fort Mears and did no material damage, but a third flight of three planes damaged the radio station and demolished a Quonset hut. The last flight of planes apparently had as its target the old wooden oil tanks. The bombs overshot the tanks, but killed two men. All told, about 15 fighters and 13 horizontal bombers participated in the raid. All the bombers were tracked in at about 9,000 feet. No fighters from Fort Glenn, 65 miles away, managed to intercept. The morning of June 4 was rainy and overcast. At 1740 Hours Fisherman's Point Army Observation Post reported three flights of bombers headed for Dutch Harbor. At 1800 fire was opened as ten fighters attacked the Naval Air Station in a low strafing attack. Then 11 D3A Aichi "Vals" delivered a dive-bombing attack. Each carried one large bomb, which was released after a shallow dive to 1,500 feet. The chief damage was to four new 6,666-barrel fuel oil tanks, which had been filled for the first time on June 1 by the oiler S. S. Brazos. The oil tanks were totally destroyed and can be seen burning behind the soldiers. The Japanese also scored hits on a warehouse and an empty aircraft hangar. At 1821 three B5N2 "Kates" approached from the northeast. Their five bombs fell harmlessly into the harbor. The final attack of the day came at 1825, when five planes, approaching at high altitude from the northwest, dropped bombs near the magazine area near the south slope of Mt. Ballyhoo. Nine bombs were ineffective, but the tenth killed an officer and three men in a Navy 20-mm. gun emplacement. American casualties during all the attacks were 33 Army, 8 Navy, 1 Marine Corps, and 1 civilian killed, plus about 50 wounded. 

Source:
NARA (National Archives) Record Group 80: General Records of the Department of the Navy, 1804 - 1983 (ARC identifier: 409). Series: General Photographic File of the Department of Navy, compiled 1943 - 1958, documenting the period 1900 - 1958 (ARC identifier: 520587). NAIL Control Number: NWDNS-80-G-12076 
http://commons.wikimedia.org/wiki/File:Japanese_attack_on_Dutch_Harbor,_June_3,_1942._Group_of_Marines_on_the_%22alert%22_between_attacks._Smoke_from_burning..._-_NARA_-_520589.tif
http://www.worldwar2database.com/gallery3/index.php/wwii1047

American POWs Reenact Surrender of Corregidor to Imperial Japanese Army


Image size: 1499 x 1600 pixel. 691 KB
Date: Sunday, 31 May 1942
Place: Corregidor, Luzon, Philippines
Photographer: Unknown

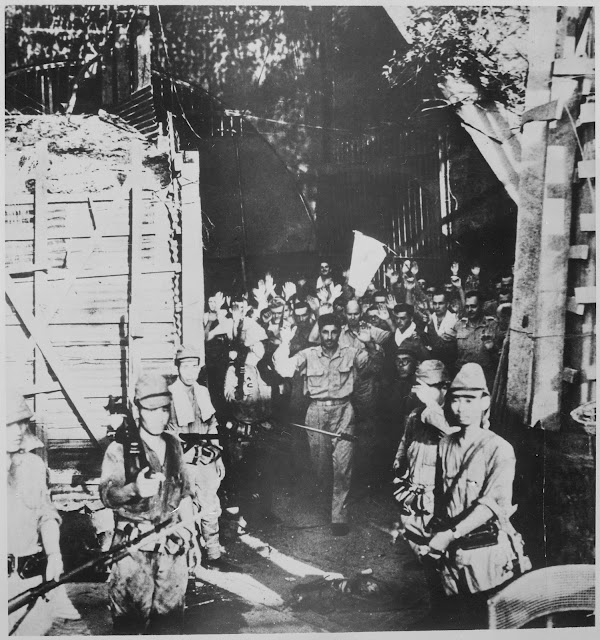
American Prisoners of War, retained after most of Corregidor's 11,000 defenders were moved off the island, are forced to reenact the surrender of Malinta Tunnel. This is the East Entrance of Malinta. Much propaganda was made about the surrender of the Philippines. The Japanese kept two work parties on the island, one held at the lower level of the hospital to replace a 12" gun tube at Battery Hearn and to use parts from Battery Chicago on Morrison Hill to fix the damaged Battery Ramsey's 6" guns. Battery Ramsey was completely destroyed by the American liberation in 1945. The second work detail, probably shown here, collected scrap metal for shipment back to Japan. The Prisoner of War camp began with 240 men that the Japanese retained on the island after shipping the other defenders off island by May 23, 1942. The men were in various quarters on the island but no single camp for the entire war. An additional 76 officers and enlisted men arrived from Cabanatuan on June 7, 1942. Senior officer was Lieutenant Colonel Lewis S. Kirkpatrick. The hospital was moved to Bilibid Prison in July 1942, and 66 men were removed to Manila in October. The men were paid for the first time in October 1942 and received Canadian Red Cross packages for Christmas. Because of the availability of hidden food stores and supplies coming into Corregidor for shipment to Japan, the men were relatively well fed during their time there. The Japanese did not favor the leftover American stores of corned beef and stewed tomatoes, which supplemented the prisoners' diet. That changed for the Americans when they arrived at the Bilibid Prison Camp and when they were shipped to other camps in Manchuria and Japan. Kirkpatrick died of pneumonia on April 27, 1943. All American prisoners on Corregidor were moved to Bilibid on June 8, 1943. 

Source:
NARA (National Archives) Record Group 208: Records of the Office of War Information, 1926 - 1951 (ARC identifier: 535). Series: Photographs of the Allies and Axis, compiled 1942 - 1945 (ARC identifier: 535523). NAIL Control Number: NWDNS-208-AA-80B-1. Select List Identifier: WWII #129 
http://commons.wikimedia.org/wiki/File:Surrender_of_American_troops_at_Corregidor,_Philippine_Islands,_05-1942_-_NARA_-_535553.jpg
http://www.worldwar2database.com/gallery3/index.php/wwii1046

Luftwaffe Troops at Stalingrad


Image size: 1600 x 1071 pixel. 407 KB
Date: Saturday, 19 September 1942
Place: Suburb of Minina, Stalingrad, Stalingrad Oblast, Soviet Union
Photographer: Kriegsberichter Rothkopf (PK Lfl. 4)

First published in 22 October 1942, this picture shows Luftwaffe troops securing areas recently overran by Soviet troops at Stalingrad, September 1942 (note MP 40 submachine gun!). Also note that the officer in the foreground wearing a tie: correct dress code amid chaos! Page 192 of Jason D. Mark's excellent book "Angriff: The Attack on Stalingrad in Photos" identifies the officer as Oberleutnant der Reserve Helmut Wilhelm Schnatz, Chef of 3.Batterie/Flak-Regiment 25. Date is September 19,1942 and the location is suburb of Minina. The short bio of Schnatz: SCHNATZ, Helmut (Helmut Wilhelm). (DOB: 09.12.15 in Hombruch, Krs. Dortmund-Land). (R). 04.04.36 began service in the RAD (to 30.09.36). 03.11.37 assigned to 4./FEA 34 in Münster-Handorf for basic training. 20.03.38 trf to 7./Flak-Rgt. 14 in Bonn. 16.11.38 trf to 2./le.Flak—Abt. 84 in Bonn. 22.08.39 trf to 5./Reserve-Flak-Abt. 391. 01.10.39 promo to Wachtmeister. 01.12.39 promo to Lt.d.R. 01.08.40 appt Batterie-Offizier in le.Reserve-Flak-Batterie 9/VII B.O. 16.11.40 appt Zugführer in le.Reserve-Flak-Batterie 9/VII B.O. 01.05.41 appt Ordannanz-Offizier in Stab/Reserve-Flak-Abt. 392. (n.d.) trf to Flak-Rgt. 181. 01.03.42 promo to Oblt.d.R. 30.04.42 trf to Flak-Rgt. 25 (mot). 23.06.42 Oblt.d.R. appt Führer 3./Flak-Rgt. 25 (mot). 19.09.42 KIA 5 km SE of Pescanka near Stalingrad. 17.10.42 Oblt.(d.R.), posthumously awarded Ritterkreuz, 3./Flak-Rgt. 25 (mot). So, in the same day that the picture taken, Schnatz was killed on the other side of the city. This could be his last picture!

Source:
Bundesarchiv Bild 183-B22478
http://commons.wikimedia.org/wiki/File:Bundesarchiv_Bild_183-B22478,_Stalingrad,_Luftwaffen-Soldaten_in_Ruinen.jpg


11 June 2013

Adolf Hitler Studying The Allied Landing at D-Day


Image size: 1600 x 934 pixel. 892 KB
Date: Wednesday, 7 June 1944 (16:55-18:15)
Place: Schloss Klessheim, Salzburg, Wals-Siezenheim, Austria
Photographer: Unknown

Meeting of German and Hungarian officials at Schloss Klessheim to discussed the Allied landing at Normandy which happened a day before. Standing from left to right: Reichsminister Joachim von Ribbentrop (Reichsministers des Auswärtigen), General der Flieger Günther Korten (Chef des Generalstabes der Luftwaffe), General der Artillerie Walter Warlimont (Stellvertretender Chef des Wehrmachtführungsstabs), Reichsmarschall Hermann Göring (Oberbefehlshaber der Deutsche Luftwaffe), Generalfeldmarschall Wilhelm Keitel (Chef des Oberkommandos der Wehrmacht), Generaloberst Alfred Jodl (Chef des Wehrmachtführungsstabes im Oberkommando der Wehrmacht), Generaloberst János Vörös (Hungarian Chief of Army Staff), and General der Infanterie Hans von Greiffenberg (Militärattaché an der deutschen Botschaft in Budapest und Bevollmächtigten General der Deutschen Wehrmacht in Ungarn). Sitting from left to right: Döme Sztójay (Hungarian Prime Minister) and Adolf Hitler (Führer und Reichskanzler). Bespectacled Hitler ( a rare!) studies the map of France as General Jodl points to landing beaches. In this meeting, a "happy" Hitler announces to everyone that gathered around him: "The messages could not be better! As long as they were in Britain, we could not catch them. Now, finally we have them there where we can beat them... These dummköpfe! Thank God they have finally made a landing!" The reality was far from that: After the Allied invasion, meetings at the Führer's headquarters often seemed unreal. The fronts were breaking up and planned operations were almost unthinkable.

Source:
http://weltkrieg2.de/Geschichte/Personen/Deutsche/Fuehrer/Hitler.htm

06 June 2013

German Soldiers March To The Front In Fall Blau


Image size: 1600 x 1334 pixel. 940 KB
Date: Saturday, 1 August 1942
Place: Bolkhov, Orlovskaya Oblast, Soviet Union
Photographer: Unknown

German soldiers from 25.Infanterie-Division/LIII.Armeekorps/2.Panzerarmee/Heeresgruppe Mitte marching to the front in the peak of "Fall Blau" (Case Blau), August 1942. In the background we can see the building of Savior Transfiguration Cathedral (Spaso-Preobragenskij Cathedral), built in 1841-51 to a design by one of Konstantin Thon's disciples. "Fall Blau" (later renamed Operation Braunschweig) was the German Armed Forces' (Wehrmacht) name for its plan for the 1942 strategic summer offensive in southern Russia between 28 June and 24 November 1942. The operation was a continuation of the previous year's Operation Barbarossa intended to finally knock the Soviet Union out of the war, and involved a two-pronged attack against the rich oilfields of Baku as well as an advance in the direction of Stalingrad along the Volga River, to cover the flanks of the advance towards Baku. For this part of the operation, Army Group South (Heeresgruppe Süd) of the German Army (Wehrmacht Heer) was divided into Army Groups A and B (Heeresgruppe A and B). Army Group A was tasked with crossing the Caucasus mountains to reach the Baku oil fields, while Army Group B protected its flanks along the Volga. Initially, the German offensive saw spectacular gains with a rapid advance into the Caucasus capturing vast areas of land and several oil fields. However, the Red Army decisively defeated the Germans at Stalingrad, following Operations Uranus and Little Saturn. This defeat forced the Axis to retreat from the Caucasus in fear of becoming trapped. Only the city of Kursk and the Kuban region remained tentatively occupied by Axis troops.

Source:
http://www.lexikon-der-wehrmacht.de/Gliederungen/Infanteriedivisionen/25ID-R.htm
http://www.ww2incolor.com/german/troops_retreat.jpg.html

Wounded SS With StuG and Destroyed T-34


Image size: 1600 x 1155 pixel. 481 KB
Date: Tuesday, 7 October 1941
Place: Staniza-Nowopaskaja, Sea of Azov, Soviet Union
Photographer: Unknown

A Sturmgeschütz (StuG) III A of the 1.Batterie/SS-Sturmgeshütz-Abteilung "Leisbstandarte SS Adolf Hitler" (commanded by SS-Untersturmführer Georg Isecke) approaches the Soviet T-34 tank that just recently destroyed. Other Waffen-SS men are evacuating SS-Unterscharführer Martin Hermann August Bergemann (born 30 July 1920 in Berlin-Heiligensee) from 1.(Krad.-)Kompanie/SS-Aufklärungs-Abteilung "Leisbstandarte SS Adolf Hitler" after his unsuccessful attempt to destroy the tank with a mine. Several rounds fired against the tank at a range of 25 meters failed to damage it. Destruction came as a result of gasoline 'bombs' being hurled against the vehicle and setting it afire. It is possible that the damage to the track and road wheels was done by means other than gasoline bomb. Bergemann died of his wounds in the same day and then buried in Melitopol, Ukraine. This brave young warrior is listed as one of the early tank destroyer of the Wehrmacht.
Source:
Book "Waffen-SS in Action" by Norman Harms and Ron Volstad, page 15
http://www.volksbund.de/index.php?id=1775&tx_igverlustsuche_pi2[gid]=03195b53b216d97b5230c47fa55c3a8d

05 June 2013

Wrecked B-17C Flying Fortress at Hickam Field


Image size: 1600 x 1131 pixel. 476 KB
Date: Sunday, 7 December 1941
Place: Pearl Harbor, Hawaii, United States
Photographer: Tai Ling Soo

Wrecked Army Air Corps B-17C (serial 40-2074) Flying Fortress of 38th Reconnaissance Squadron near Hangar 5 at Hickam Air Field, following the end of the Japanese raid. This plane, piloted by Captain Raymond T. Swenson, was one of those that arrived during the raid. It had been the second plane to take off from Hamilton Field, San Rafael, California the previous evening, was now rounding Diamond Head and preparing to land at Hickam. Second Lieutenant Ernest Reid, the co-pilot, was anxious to be on the ground. The whole crew was badly in need of a brief rest after the long flight, and all were looking forward to an afternoon on the sunny beaches of Waikiki. First Lieutenant William R. Schick, the flight surgeon, watched the big island spread out below him from his passenger seat in the aircraft. Second Lieutenant H. R. Taylor, the navigator, was snapping photographs, though he was somewhat mystified by the early morning fireworks he saw in the distance. Captain Swenson assumed the locals were burning sugarcane. He was still unaware of the battle that raged below. The landing gear was lowered and his B-17 dropped to 600 feet for final approach before the crew got a good look at the airfield, now fully under attack. Japanese Zeroes zoomed in to rake the inbound Flying Fortress with a stream of tracers. It was too late to pull up and abort, so the pilot steeled himself against the looming inferno and stayed on course. To the rear Lieutenant Schick cried out, "Damn it! Those are real bullets they're shooting. I'm hit in the leg." The incendiaries ignited the magnesium flares on the plane and they burned furiously. Smoke filled the cockpit as the B-17C dropped earthward, and then hit hard on what was left of the runway. The big bomber broke completely in half. In that moment Captain Swenson's B-17 gained the dubious distinction of being the first American airplane to be shot down in World War II. Lieutenant Masanobu Ibusuki and Lieutenant Commander Shigeru Itaya claimed credit for the B-17C. The nine crewmen scrambled for safety and Lt. Schick was shot in the head by a A6M2 Zero-Sen. Four others were wounded. Swenson and Reid set the parking brakes and shut down the engines on the burning aircraft. Note bicycle parked by the plane. Pith helmet by the case in the left foreground indicates that the photographer was Tai Sing Loo. 

Source:
http://www.worldwar2database.com/gallery3/index.php/wwii1044

Destroyers Stand By to Pick Up Survivors as USS Yorktown (CV-5) is Abandoned


Image size: 1600 x 1308 pixel. 363 KB
Date: Thursday, 4 June 1942
Place: Midway, Oceania
Photographer: Unknown

Destroyers stand by to pick up survivors as USS Yorktown (CV-5) is abandoned during the afternoon of June 4, following Japanese torpedo plane attacks. Destroyers at left are (left to right): USS Benham (DD-397), USS Russell (DD-414), and USS Balch (DD-363). Destroyer at right is USS Anderson (DD-411). Photographed from USS Pensacola (CA-24). At about 1400 on June 4, 1942, soon after Yorktown began to move again following bomb damage repairs, her radar detected a second incoming raid from the Japanese carrier Hiryu. This formation included ten torpedo planes commanded by Lieutenant Joichi Tomonaga, plus six escorting fighters. As they approached, Yorktown steadily increased her speed to about twenty knots and launched additional "Wildcats", some with very little fuel. Despite losses to the defending F4F fighters and heavy anti-aircraft fire, the Japanese planes pushed on to deliver a beautifully coordinated torpedo attack. Approaching Yorktown from both sides, in an attack designed to divide her defenses and make it impossible for her to maneuver to avoid all their "fish", the Japanese strike force dropped several of the very effective Type 91 torpedoes. Those coming from starboard missed, but one hit Yorktown squarely amidships on the port side. She immediately took a slight list and started to turn. Then a second torpedo hit, in almost the same place. The two warheads opened a very large hole, flooding machinery spaces and other compartments. Her propulsion knocked out once again, Yorktown coasted to a stop and began to list dangerously. Within a few minutes of her torpedoing, USS Yorktown had listed heavily to port, almost bringing her hangar deck to sea level. More importantly, she had lost all steam and electrical power, and therefore could not effectively control and counter flooding. Facing a threat that the stricken carrier might capsize, drowning most of her crew, her Commanding Officer, Captain Elliot Buckmaster, made the reluctant decision to abandon ship. At about 1500 hours on 4 June, the grim process got underway, as crewmen began to go down knotted ropes into the oily water surrounding their ship. Escorting destroyers sent boats and stood by to pick up the survivors. One destroyer, USS Benham (DD-397) took in over 700 men, three times as many as in her own crew!

Source:
Official U.S. Navy Photograph #80-G-21694, now in the collections of the U.S. National Archives
http://www.history.navy.mil/photos/events/wwii-pac/midway/mid-8a.htm
http://www.worldwar2database.com/gallery3/index.php/wwii1043

Japanese Bomb Impacts USS Enterprise (CV-6) During Battle of the Eastern Solomons


Image size: 1600 x 1275 pixel. 665 KB
Date: Monday, 24 August 1942
Place: Eastern Solomons, Solomon Islands
Photographer: Photographer's Mate 2nd Class Marion Riley

A Japanese bomb exploding on the flight deck of USS Enterprise (CV-6), just aft of the island, on 24 August 1942. According to the original photo caption, this explosion killed the photographer, Photographer's Mate 2nd Class Robert F. Read. However, Morison's "History of U.S. Naval Operations in World War II" (volume 5, page 97) states that Read was killed by the bomb that had earlier hit the after starboard 5"/38 gun gallery, which can be seen burning in the upper left. Morison further states that the bomb seen here exploded with a low order detonation, inflicting only minor damage. One of the most famous images of the Pacific War - a bomb caught at the instant it exploded on the Big E's flight deck during the Eastern Solomons battle - has long been attributed to Photographer's Mate Second Class Robert Frederic Read. Read lost his life during the battle of 24 August 1942 and it is widely believed that his final photo was of the bomb that killed him. While outwardly plausible, the story contradicts the historical record. Enterprise's action report for 24 August 1942 indicates that four photographers were in action during the afternoon attack. Ralph Baker (PhoM 1/c) and Read both operated still cameras: Baker from a point forward of the island, Read from the aft starboard 5" gun gallery, at flight deck level. Marion Riley (PhoM 2/c) manned a motion picture camera from the aft end of the ship's island, above the flight deck. W. Edward Smith (PhoM 2/c) was stationed in the Air Plot, also in the ship's island. Read, the action report states, photographed the enemy planes as they attacked and were shot down. The first bomb to strike the ship did not deter him, but the second bomb destroyed the gun platform were Read was stationed. Read was killed instantly by this bomb, along with 37 other men. The bomb exploding in the photo was the third to hit the ship, and was photographed from above the flight deck. Torpedo Ten photographer Joe Houston recently contacted both Smith and Riley's son, Marion Riley III. Ed Smith indicated, and Mr. Riley confirmed, that the photo is Marion Riley's. Riley's camera was damaged by the explosion, but the film survived. A dramatic sequence of stills from the film was published in Life Magazine months after the battle. Read's legacy is not diminished by this revelation. It appears that at least one of Read's photos survives to this day: that of an enemy plane burning on the sea while the Big E races by just yards away. The ship's rail, the curve of the hull, and the angle of the shot all indicate this photo was taken from the aft starboard quarter of the ship, where Read was stationed. More of Read's photos probably languish in the archives, waiting only for proper identification. 

Source:
Official U.S. Navy Photograph 80-G-17489, now in the collections of the National Archives
http://www.history.navy.mil/photos/sh-usn/usnsh-e/cv6-a.htm
http://www.worldwar2database.com/gallery3/index.php/wwii1042

Four of the Best Pilots From Jagdgeschwader 51 (JG 51) "Mölders"


Image size: 1600 x 1117 pixel. 352 KB
Date: Friday, 22 May 1942
Place: Soviet Union
Photographer: Unknown

Four of the best pilots from Jagdgeschwader 51 (JG 51) "Mölders" posed together for the camera. From left to right: Oberfeldwebel Heinrich "Dicke" Höfemeier (Flugzeugführer in 1.Staffel/Jagdgeschwader 51; Ritterkreuz 5 April 1942; final score 96 air victories from 490 combat missions); Leutnant Erwin Fleig (Staffelkapitän 2.Staffel/Jagdgeschwader 51; Ritterkreuz 12 August 1941; final score 66 air victories from 506 combat missions), Hauptmann Oskar-Heinrich "Heinz" Bär (Gruppenkommandeur I.Gruppe/Jagdgeschwader 77; Ritterkreuz 2 July 1941, Eichenlaub 14 August 1941; Schwerter 16 February 1942; final score 220 air victories from over than 1,000 combat missions); and Oberleutnant der Reserve Heinrich "Gaudi" Krafft (Staffelkapitän 3.Staffel/Jagdgeschwader 51; Ritterkreuz 18 March 1942; final score 78 air victories). Bär was former Staffelkapitän of 1.Staffel/Jagdgeschwader 51 before being promoted as Gruppenkommandeur of I.Gruppe/Jagdgeschwader 77 in 11 May 1942. The accumulation of the air victories from these four pilot is 460 kills! After the Winter offensive in the Eastern Front there followed a lull in operational intensity, with April–June 1942 seeing little fighting in the air. However, JG 51 lost three of its experten in less than ten days; Lt. Hans Strelow,(68 victories) was lost on 22 May; 2. JG 51's Oblt. Erwin Fleig (66 victories), ex-wingman to Werner Mölders, bailed out and captured on 29 May; and two days later Hptm. Josef Fozo (27 victories), Kommandeur I./JG 51, was severely injured in a landing accident and would never return to first-line service!

Source:
http://www.historicalwarmilitariaforum.com/topic/3401-my-research-and-collecting-interest-sudeten-rkt-and-dkig-tr%C3%A4gers/

04 June 2013

VMF-214 "Black Sheep" at Espiritu Santo


Image size: 1600 x 1111 pixel. 450 KB
Date: Tuesday, 7 September 1943
Place: Turtle Bay Fighter Strip, Espiritu Santo, Vanuatu
Photographer: Unknown

Major Gregory Boyington's VMF-214 Black Sheep Squadron on Turtle Bay fighter strip on Esperitu Santo. VMF-214 poses for a group picture before leaving for their operations in the Russell Islands. An F4U-1 is in the background. In their two tours of combat, the Black Sheep shot down 94 Japanese aircraft and counted nine aces (5 or more enemy aircraft shot down.) Gregory Boyington was shot down on January 3, 1944 and spent the remainder of the war in Omori Prison Camp. The Black Sheep were disbanded after their second tour. Gregory "Pappy" Boyington (December 4, 1912 – January 11, 1988) was a United States Marine Corps officer who was an American fighter ace during World War II. For his heroic actions, he was awarded both the Medal of Honor and the Navy Cross. Boyington flew initially with the American Volunteer Group in the Republic of China Air Force during the Second Sino-Japanese War. He later commanded the U.S. Marine Corps squadron VMF-214 ("The Black Sheep Squadron") during World War II. Boyington became a prisoner of war later in the war.

Source:
http://www.worldwar2database.com/gallery3/index.php/wwii1041