Showing posts with label Destroyed War Machine. Show all posts

02 April 2023

Abandoned Königstiger of s.SS.Pz.Abt.101

Image size: 2680 x 1429 pixel. 988 KB
Date: Friday, 1 September 1944
Place: Beauvais, Oise, France
Photographer: Unknown

Panzerkampfwagen IV ausf B Tiger II Fahrgestellnummer (Hull Number) 280093, turmnummer (turret number) 104, of Schwere SS Panzer Abteilung (Heavy SS Tank Battalion) 101, after the crew abandoned the vehicle. Note that the hull mounted MG34 machine gun has been removed. After the destruction of the German military units in the Falaise Pocket, the surviving soldiers and their vehicles and horses made a dash for the Seine River in late August 1944. Several bridges were intact after repeated bombings, and the Allied divisions were severely depleted after two months of combat operations and unable to bring sufficient forces to prevent their escape. SS Abteilung 101 received fourteen Tiger IIs in late July and early August. As the Germans retreated into Germany, they engaged Allied forces in a defensive role, in which they excelled. On August 23, SS Abteilung 101 supported the 18th Luftwaffe (Air Force) Field Division in an attack on Guitracourt. Tiger II 104's commander, SS-Oberscharfuhrer Sepp Franzl (Squad Leader, or Warrant Officer) was the 1.Kompanie Headquarters Squad Leader. On August 29, Franzl's tank was hit by shellfire in the suspension near Magny-en-Vexin. Unaware of the damage, the crew engaged a British anti-tank gun in a barn at Aux Marais. When the Tiger II sharply turned to move away, the suspension failed, immobilizing the tank. Franzl and his crew bailed out. French Forces Françaises de l'Intérieur (Forces of the Interior), irregular bands of resistance fighters, observed the crew and fired when they bailed out. Sources vary on whether two crewmen were killed or made it back to German lines. A Sherman tank commanded by a Sergeant Roberts of A Squadron, 23rd Hussars, 11th Armoured Division, came across the tank and fired on it. German tanks would sometimes "play dead" to ambush Allied armor, so any German tank was fired upon. Roberts reported the engagement and was given credit for the kill. The abandoned tank was left in the field until December 1944. Frozen in place, gasoline fires were required to move it. The damaged suspension also proved problematic for the recovery crew. The tank was taken to the Bovington Proving Grounds in January 1945. Until 2006 the tank was on private display at the Royal Defense Academy in Shrivingham, Oxfordshire. Then it was returned to the Bovington Tank Museum for renovation and possible return to running condition.


Source :
https://www.themodellingnews.com/2018/07/tmn-on-tour-bovington-tank-museum-tiger.html
https://worldwar2database.com/gallery/wwii0150

26 March 2023

Abandoned Königstiger of schwere Panzer-Abteilung 506

Image size: 2126 x 1663 pixel. 1.2 MB
Date: Thursday, 18 January 1945
Place: Villers-la-Bonne-Eau, Luxembourg
Photographer: Unknown

An Abandoned Panzerkampfwagen VI ausf B (SdKfz 182) Tiger II or Königstiger (Bengal Tiger) of Schwere Panzer Abteilung (Heavy Tank Battalion) 506, Sixth Panzer Army, is inspected by American soldiers of the 137th Infantry Regiment, 35th Infantry Division. Note the Tiger II's 88mm (3.46 inch) locked in the recoil position, destroyed by the retreating crew. The 35th Infantry Division was rushed into the area to stop the German offensive around December 20, 1944. On December 28, the Division had fought their way to Villers-la-Bonne-Eau, near Bastogne, attempting to relieve the 101st Airborne Division and elements of the 10th Armored Division. By December 31 the 137th Infantry had lost two companies captured by the 1st SS Panzer Division, attempting to retake the village after Bastogne's relief. The 137th had lost 200 men killed or captured. On January 10, the 137th retook Villers. The 506th was the only Heer (Regular Army) unit equipped with the Tiger II, as opposed to the Waffen SS Abteilungs in operation in Belgium. The unit had only operated Tiger tanks, and for the Ardennes Offensive, a fourth company, Schwere Panzer Abteilung Hummel, was attached operating Panzerkampfwagen IV ausf E Tiger Is. On January 17, 1944, as the Sixth Panzer Army retreated from American breakthroughs around Bastogne, the 506th was forced to abandon two Tiger IIs and one Tiger I. While individually superior to any Allied tank, the Tiger II consumed considerable resources and was yet another tank type that a strained German quartermaster corps had to supply with fuel, ammunition, and spare parts. The Tiger II had a range of only 90 miles (145 kilometers). In its rush to combat it suffered from mechanical reliability defects; most Americans saw abandoned, not destroyed, Tiger IIs. This was a blessing for the Americans, whose M4 Sherman medium tanks and M10 Wolverine tank destroyers, both armed with 3-inch guns, could not penetrate the 180mm (7 inch) thick frontal armor. Only the M36 Jackson, with a high velocity 90mm gun, could stop a Tiger II, and only at a range within that of the German tank. All of the American tanks and tank destroyers had armor that was easily defeated by the Tiger II's 88mm KwK 43 L/71 main gun. The Americans counted on their superiority in artillery and air power to destroy Tigers.


Source :
https://ardennes-breakthrough-association.com/tiger-ii-03-abteilung-506/
https://worldwar2database.com/gallery/wwii0149

20 March 2023

Abandoned "Porscheturm" Königstiger of s.Pz.Abt.503 in Normandy


Image size: 1600 x 964 pixel. 462 KB
Date: Wednesday, 30 August 1944
Place: Amiens, Normandy, France
Photographer: unknown

Panzerkampfwagen IV ausf B (Sdkfz 182) with turret designed by Krupp for the Tiger II designed by Professor Doctor Ferdinand Porsche (September 3, 1875 – January 30, 1951). This Tiger II of Schwere Panzer Abteilung 503 was abandoned by Leutnant Rambow's crew during the Normandy Campaign. Rambow was leading two Tigers through Beauvais when one threw a track on the Rue Antoine Caron. The crew of the other Tiger started repairs when the British 4th/7th Royal Dragoon Guards of the 8th Armoured Brigade entered the town and fired on the disabled Tiger. The crew fled and made it back to German lines. Leutnant Rambow fought the British to Amiens, where he ran out of fuel and ammunition. His crew set fire to the vehicle, causing the suspension to settle. Note missing outer road wheels.

In 1941, Doctor Porsche was contracted, along with Henschel und Sohn, to design the Tiger II tank. Porsche's design used more copper wiring, which led to the adoption of the Henschel design as the production Tiger II on November 11, 1942. Porsche was so sure that his design would be accepted he had ordered Krupp to begin production of their turret for his design; fifty were completed when the contract was canceled. Henschel began designing the new Tiger II, but to move the project along, the Porsche turrets were fitted to the new Henschel design. These tanks were issued first to Schwere Panzer Abteilung 503. Twelve Porscheturm (Porsche Turret) Tiger IIs and two Henshelturm (Henschel Turret) Tiger IIs were issued between May 1944 and June 1944, when Panzer Abteilung 503 left for Normandy. The Porscheturm Tiger IIs had a stronger turret because of the curved surface deflecting anti-tank rounds, but a shot trap caused rounds that hit under the curved gun mantlet were deflected into the driver's compartment, killing the driver and the radio operator. However, most Tiger IIs were not lost to Allied tanks; artillery and fighter-bombers were the chief combat losses of Tiger IIs. More than that, the Tiger II suffered from poor road performance and its heavy weight caused French and Belgian bridges to collapse. More Tiger IIs were lost to mechanical breakdown than in combat. Of the twenty-six Tiger IIs Panzer Abteilung 503 was issued during the Normandy Campaign, only two survived.


Source :
https://maquettes-missiles.blogspot.com/2018/04/le-char-super-lourd-maus.html
https://www.modellismopiu.it/modules/newbb_plus/print.php?forum=8&topic_id=24606
https://worldwar2database.com/gallery/wwii0152

12 March 2023

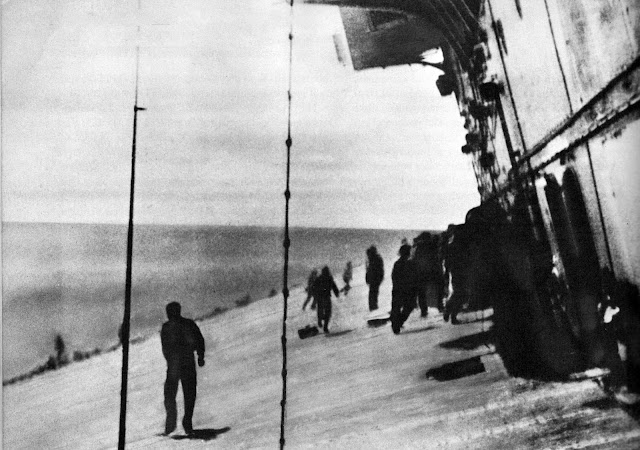
Flight Deck of USS Yorktown After Being Hit by the Japanese

Image size: 3000 x 2107 pixel. 1.1 MB
Date: Thursday, 4 June 1942
Place: Pacific Ocean
Photographer: unknown

Looking forward on the flight deck of USS Yorktown (CV-5) shortly after she was hit by two Japanese aerial torpedoes, 4 June 1942. Men are preparing to abandon ship. Island's port side is at right, with the curved supporting structure for the Primary Flight Control booth at top. Knotted lines in the foreground were apparently used to evacuate the island's upper platforms. The planes which scored torpedo hits were shot down either in passing the Yorktown or in attempting to pass through the fire of her escorting vessels. Not one of the attacking squadron returned to its carrier. By 1447 firing ceased. The Yorktown, listing heavily to port, was losing speed and turning in a small circle to port. She stopped and white smoke poured from her stacks. The screening vessels began to circle. Inside the Yorktown all lights had gone out. The Diesel generators were cut in, but the circuit breakers would not hold and the ship remained in darkness. The list gradually increased to 26 Degrees. Without power nothing could be done to correct it. The Commanding Officer and the Damage Control Officer thought it probable that the ship would capsize in a few minutes, and at 1455 orders were given to abandon ship. Inside, men clambered over steeply sloping decks in total darkness to remove the wounded. After an inspection on which no living personnel were found, the Commanding Officer left the ship. Destroyers closed in to pick up survivors.


Source :
United States Naval Historical C
https://worldwar2database.com/gallery/wwii1301

10 January 2014

USS West Virginia (BB-48) Shoots Down a Japanese Kamikaze Plane


Image size: 1600 x 1024 pixel. 375 KB
Date: Tuesday, 27 March 1945
Place: Okinawa, East China Sea, Japan
Photographer: Unknown

Joining Task Force 64 for the invasion of the Okinawa Gunto area on March 25, 1945, USS West Virginia (BB-48) was assigned to fire support section one. West Virginia spent the ensuing days softening up Okinawa for the forthcoming American landings. At 1029 Hours on March 26, lookouts reported a gun flash from shore, followed by a splash in the water some 6,000 yards off the port bow. Firing her first salvoes of the operation, West Virginia let fly 28 rounds of 16- inch gunfire against the pugnacious Japanese batteries. The following day, the "Wee Vee," as her crew called her, fought against enemy air opposition, taking a Yokosuka P1Y Ginga (Galaxy) "Frances" bomber under fire at 0520. The twin-engined bomber crashed off the battleship's port quarter, the victim of West Virginia's anti-aircraft guns. Over the days that followed, enemy suicide attacks by Japanese planes continued. From the American landing on April 1 to May 25, seven major kamikaze attacks had been attempted, involving more than 1,500 planes. Almost a score of American ships were sunk, and twenty-five others damaged. The total strength of the Allied fleet at Okinawa was 1300 ships, including 40 carriers, 18 battleships, and 200 destroyers. The U.S. Navy sustained greater casualties in this operation than in any other battle of the war!

Source:
http://www.worldwar2database.com/gallery3/index.php/wwii1110

26 December 2013

Panzergrenadiers with the Wrecked T-34


Image size: 1600 x 1235 pixel. 757 KB
Date: December 1942
Place: Verkhne-Kumskiy, Volgogradskaya Oblast, Soviet Union
Photographer: Helmut Ritgen

Near the Don, winter 1942-1943: the costly fighting following the attempt to open a corridor to the trapped 6. Armee at Stalingrad. A wrecked Soviet T-34/76, with some of its ammunition spilled on the snow, is surrounded by the curious Panzergrenadiers of 6. Panzer-Division dressed in the reversible combat suit. Operation Winter Storm (German: Unternehmen Wintergewitter) was a German offensive in World War II in which the German 4th Panzer Army failed to break the Soviet encirclement of the German 6th Army during the Battle of Stalingrad. In late November 1942, the Red Army completed Operation Uranus, encircling some 300,000 Axis personnel in and around the city of Stalingrad. German forces within the Stalingrad pocket and directly outside were reorganized under Heeresgruppe Don (Army Group Don), under the command of Generalfeldmarschall Erich von Manstein. Meanwhile, the Red Army continued to allocate as many resources as possible to the eventual launch of the planned Operation Saturn, which aimed to isolate Heeresgruppe A (Army Group A) from the rest of the German Army. To remedy the situation, the Luftwaffe attempted to supply German forces in Stalingrad through an air bridge. When the Luftwaffe proved incapable of carrying out its mission and it became obvious that a successful breakout could occur only if launched as early as possible, Manstein decided on a relief effort. Originally, Manstein was promised four panzer divisions. Due to German reluctance to weaken certain sectors by redeploying German units, the task of opening a corridor to the German 6th Army fell to the 4. Panzerarmee (4th Panzer Army). The German force was pitted against several Soviet armies tasked with the destruction of the encircled German forces and their offensive around the lower Chir River. The German offensive caught the Red Army by surprise and made large gains on the first day. The spearhead forces enjoyed air support and were able to defeat counterattacks by Soviet troops. By 13 December, Soviet resistance slowed the German advance considerably. Although German forces took the area surrounding Verkhne-Kumskiy, the Red Army launched Operation Little Saturn on 16 December. Operation Little Saturn defeated the Italian 8th Army on Army Group Don's left flank, threatening the survival of Manstein's entire group of forces. As resistance and casualties increased, Manstein appealed to Hitler and to the commander of the German 6th Army, General Friedrich Paulus, to begin the 6th Army's breakout; both refused. The 4th Panzer Army continued its attempt to open a corridor to the 6th Army on 18–19 December, but was unable to do so without the aid of forces inside the Stalingrad pocket. Manstein was forced to call off the assault on 23 December and by Christmas Eve the 4th Panzer Army began to withdraw to its starting position. Due to the failure of the 6th Army to breakout and the attempt to break the Soviet encirclement, the Red Army was able to continue the destruction of German forces in Stalingrad.

Source:
Helmut Ritgen photo collection
Book "The 6th Panzer Division: 1937-45" by Oberst a.D. Helmut Ritgen
http://en.wikipedia.org/wiki/Operation_Winter_Storm

23 December 2013

Cheerful Divisional Personnel Pose with a Wrecked Soviet T-28B tank


Image size: 1600 x 1245 pixel. 787 KB
Date: July 1941
Place: Soviet Union
Photographer: Helmut Ritgen

Cheerful divisional personnel from 6. Panzer-Division pose with a wrecked Soviet T-28B tank in the first weeks of the Russian campaign. This 25-ton Russian derivative of the British Vickers A6E1 design was armed with a 76.2mm main gun and three MGs, and was first unveiled at a parade in October 1932. Note soldier clowning with 76.2mm round! Also unidentified brigade and battalion markings on turret. In the Operation Barbarossa, the 6th Panzer-Division fighting at first under Heeresgruppe Nord (Army Group North) for Leningrad but soon transferring to Heeresgruppe Mitte (Army Group Center), where it fought in the Battle of Moscow and the Rzhev-Vyazma Salient. 

Source:
Helmut Ritgen photo collection
Book "The 6th Panzer Division: 1937-45" by Oberst a.D. Helmut Ritgen
http://en.wikipedia.org/wiki/6th_Panzer_Division_(Wehrmacht)

05 June 2013

Wrecked B-17C Flying Fortress at Hickam Field


Image size: 1600 x 1131 pixel. 476 KB
Date: Sunday, 7 December 1941
Place: Pearl Harbor, Hawaii, United States
Photographer: Tai Ling Soo

Wrecked Army Air Corps B-17C (serial 40-2074) Flying Fortress of 38th Reconnaissance Squadron near Hangar 5 at Hickam Air Field, following the end of the Japanese raid. This plane, piloted by Captain Raymond T. Swenson, was one of those that arrived during the raid. It had been the second plane to take off from Hamilton Field, San Rafael, California the previous evening, was now rounding Diamond Head and preparing to land at Hickam. Second Lieutenant Ernest Reid, the co-pilot, was anxious to be on the ground. The whole crew was badly in need of a brief rest after the long flight, and all were looking forward to an afternoon on the sunny beaches of Waikiki. First Lieutenant William R. Schick, the flight surgeon, watched the big island spread out below him from his passenger seat in the aircraft. Second Lieutenant H. R. Taylor, the navigator, was snapping photographs, though he was somewhat mystified by the early morning fireworks he saw in the distance. Captain Swenson assumed the locals were burning sugarcane. He was still unaware of the battle that raged below. The landing gear was lowered and his B-17 dropped to 600 feet for final approach before the crew got a good look at the airfield, now fully under attack. Japanese Zeroes zoomed in to rake the inbound Flying Fortress with a stream of tracers. It was too late to pull up and abort, so the pilot steeled himself against the looming inferno and stayed on course. To the rear Lieutenant Schick cried out, "Damn it! Those are real bullets they're shooting. I'm hit in the leg." The incendiaries ignited the magnesium flares on the plane and they burned furiously. Smoke filled the cockpit as the B-17C dropped earthward, and then hit hard on what was left of the runway. The big bomber broke completely in half. In that moment Captain Swenson's B-17 gained the dubious distinction of being the first American airplane to be shot down in World War II. Lieutenant Masanobu Ibusuki and Lieutenant Commander Shigeru Itaya claimed credit for the B-17C. The nine crewmen scrambled for safety and Lt. Schick was shot in the head by a A6M2 Zero-Sen. Four others were wounded. Swenson and Reid set the parking brakes and shut down the engines on the burning aircraft. Note bicycle parked by the plane. Pith helmet by the case in the left foreground indicates that the photographer was Tai Sing Loo. 

Source:
http://www.worldwar2database.com/gallery3/index.php/wwii1044

05 May 2013

USS Shaw (DD-373) Destroyed in Floating Drydock YFD-2


Image size: 1600 x 1284 pixel. 592 KB
Date: Sunday, 7 December 1941
Place: Pearl Harbor, Hawaii, United States
Photographer: Unknown

USS Shaw (DD-373) wrecked in floating drydock YFD-2 on December 7, 1941, with fires were nearly out but structure still smoking. Her bow had been blown off by the explosion of her forward magazines, after she was set afire by Japanese dive bombing attacks. In the right distance are the damaged and listing USS California (BB-44) and a dredge. Raised out of the water in drydock, along with the old harbor tug Sotoyomo (YT-9), Shaw attracted the unwelcome attention of several dive bombers of the second strike wave. These hit her with three bombs at about the same time as they were attacking the then-nearby battleship USS Nevada (BB-36). These bombs all hit the forward portion of the ship. The resulting fires proved uncontrollable, and Shaw was ordered abandoned. As efforts were underway to flood the drydock about a half-hour after she was hit, her forward ammunition magazines detonated in a spectacular blast, completely removing her bow. The blast also punctured YFD-2 and Sotoyomo. Both soon sank, the drydock partially and the tug completely, leaving Shaw's after portion afloat, with an intense fire raging at its front. 

Source:
NARA (National Archives) Identifier 196078
http://www.archives.gov/legislative/features/day-of-infamy/
http://www.worldwar2database.com/gallery3/index.php/wwii1025

28 April 2013

USS Maryland (BB-46) and Capsized USS Oklahoma (BB-37)


Image size: 1600 x 1202 pixel. 507 KB
Date: Sunday, 7 December 1941
Place: Pearl Harbor, Hawaii, United States
Photographer: Unknown

USS Maryland (BB-46) moored at berth F-5 alongside the capsized USS Oklahoma (BB-37). USS West Virginia (BB-48) is burning in the background. The unfortunate Oklahoma, an older ship with much less adequate protection against underwater damage, was hit by up to nine torpedoes. Her hull's port side was opened almost completely from below the forward gun turret back to the third turret, a distance of over 250 feet. She listed quickly, her port bilge struck the harbor bottom, and she then rolled almost completely over. Oklahoma came to rest less than twenty minutes after she was first hit. Some of her starboard underwater hull and the starboard propeller were now all that showed above the surface of Pearl Harbor. Some of Oklahoma's men were still alive inside her upturned hull, and their rescue became the focus of an intense effort over the next two days. Thirty-two Sailors were recovered alive, but over four-hundred were killed. In 1943, the capsized ship was rolled upright and raised in one of the salvage profession's greatest undertakings, but she was not further repaired. Maryland was hit by two bombs, which caused relatively light damage and some flooding forward. Four of her men lost their lives. The battleship was able to steam to the west coast for final repairs later in December and was fully returned to service in February 1942. 

Source:
NARA (National Archives) Identifier 306553
http://en.wikipedia.org/wiki/File:USSMarylandPearlHarbor.jpg
http://www.history.navy.mil/photos/events/wwii-pac/pearlhbr/ph-okm.htm
http://www.worldwar2database.com/gallery3/index.php/wwii1014

27 April 2013

Nakajima B5N2 Type 97 Attack Bomber Shot Down at Hospital Point, Pearl Harbor


Image size: 1600 x 1214 pixel. 0.98 MB
Date: Sunday, 7 December 1941
Place: Naval Hospital, United States Navy, Pearl Harbor, Hawaii, United States
Photographer: Unknown

Wing of a Japanese Navy Type 97 Nakajima B5N2 carrier attack aircraft that crashed at the Naval Hospital, Pearl Harbor, during the attack. This plane came from the aircraft carrier IJN Kaga and had the tail code AII-35?. Its "Rising Sun" insignia was later largely cut away by souvenir hunters. AII-35? was piloted by Airman First Class Syuzo Kitahara with Observer Petty Officer Second Class Yoshio Shimizu and Gunner/Radio Operator Petty Officer Second Class Haruo Onishi. The third B5N2 to attack USS West Virginia in Kaga's first wave, Kitahara's plane was hit multiple times by incendiaries that severed his fuel lines. He broke off his attack as his plane caught fire; Onishi jumped without a parachute, landing near USS New Orleans (CA-32) and USS San Francisco (CA-38). He was recovered from the water alive but soon died of his injuries. Kitahara, struggling with his burning plane, avoided the Navy Yard's large Hammerhead crane and flew down the length of 1010 Dock. Observers noted the burning plane's hydraulics failed and the landing gear began to lower. Kitahara, probably unable to control the plane any more, headed for the Naval Hospital. Captain Reynolds Hayden (September 30, 1883 - February 5, 1952) Commanding Officer of the Naval Hospital, later wrote Kitahara seemed to head "directly towards the front of the main hospital building." Kitahara stood up and let go of the controls just as the plane veered to the left and crashed between the laboratory building and the Chief Petty Officer's quarters. Hayden noted the two Japanese officers were dead, their dismembered bodies strewn across the crash site. An angry Marine began screaming he would kill the Japanese, while holding the dead man's leg. He realized what he was doing and took the man's boot as a souvenir! Private First Class Marion M. Milbrandt, summoned to the Naval Hospital grounds with his 1,000-gallon water pumper, fought the resulting fire. The fire, fed by the crashed plane's gasoline, threatened the facility, but Milbrandt and his crew controlled the blaze. The Hospital laboratory was severely damaged and some research animals were destroyed. The Japanese lost five B5N2 bombers from Kaga during the first wave. Special thanks to David Aiken for his research on the crew of AII-35?. 

Source:
NARA (National Archives)
http://research.archives.gov/search?refinegrp_format=Image%20%28GIF%29&expression=pearl+harbor+attack+mime-type-label%3A%22Image+%28GIF%29%22+OR+mime-type-label%3A%22Image+%28JPG%29%22&pg_src=brief&data-source=archival-descriptions-with-digital-objects
http://www.worldwar2database.com/gallery3/index.php/wwii1013

24 February 2013

Panther Ausf A Destroyed by XIX Tactical Air Command


Image size: 1600 x 800 pixel. 278 KB
Date: Saturday, 14 October 1944
Place: Ployart-et-Vaurseine, Champagne-Ardenne, France
Photographer: Unknown


Panzerkampfwagen V Panther ausf A of 11. Panzer-Division after bombing by United States Army 9th Air Force, XIX Tactical Air Command (TAC). The British Royal Air Force Hawker Typhoons of the 2nd Tactical Air Force carried four 20mm Hispano cannon, two 1,000-pound (450 kilogram) and four 60-pound (27.2 kilogram) RB-3 rockets. The United States Army Air Force Republic P-47 Thunderbolts of the 8th and 9th Air Forces carried eight Browning .50 caliber machine guns, 2,500 pounds (1134 kilograms) of bombs and ten 5-inch (127mm) rockets. The Germans called them "jäger-bombern" or "jabos" (prounounced "ya-bows") for short. While the cannon and machine guns weren't powerful enough and the rockets and bombs weren't accurate enough to stop most German tanks, the sheer terror of a jabo attack could scatter ground forces and wreck soft-skinned trucks and horse-drawn elements, leaving the tanks unprotected. The rockets were the equivalent of a broadside from a naval warship. Panther turmnummer (turret number) 252, the 2nd vehicle of the 5.zug (5th platoon) of 2.kompanie (2nd company), has an impact from a bomb hit on the glacis (front hull) armor by the right tread and was knocked out during General George S. Patton's campaign to enter Germany through Lorraine. TAC flew 12,000 sorties in support of Patton in August 1944; weather had reduced operations to 3,500 sorties by November. The distance to the Normandy beaches and the lack of gasoline, ammunition and food kept Third Army from major offensive operations until the Ardennes Offensive in December 1944. The same day, the Douglas A-20 Havocs and Martin B-26 Marauders of the 9th Air Force were grounded because of bad weather. 

Source:
National Archives and Records Administration  (NARA) 111-SC-329852
http://www.network54.com/Forum/47207/thread/1059293387/Re-+11-+Pz+Div+Panthers---probably+a+2-SS+Panther
http://www.worldwar2database.com/gallery3/index.php/wwii0143

23 February 2013

Americans Approach Panther Ausf A in Periers, France


Image size: 1600 x 1144 pixel. 331 KB
Date: Tuesday, 1 August 1944
Place: Periers, Normandy, France
Photographer: Fred Ramage

A Panzerkampfwagen V Panther ausf A is used as a target for a staged series of photos of American troops engaging it. The Panther was hit by two bazooka teams placed on opposite sides, then American infantry moved up to attack the tank directly. In actual combat, this would have been suicidal if the crew was still alive and operating the three MG42 7.92mm (.31 caliber) machine guns would be used to cut down the infantry. Since this tank is missing a tread, it's unlikely it's a combat photo. Since none of these soldiers are carrying automatic weapons or grenades, it's unlikely they will be able to force their way into the tank. Periers was liberated by the 2nd Battalion, 359th Infantry Regiment, 90th Infantry Division, VIII Corps, on July 27, 1944. Within a few hours the 4th Armored Division's M4 Sherman medium tanks were moving through Periers on their way to drive on Saint Lo as part of Operation Cobra, the breakout from Normandy that will liberate Paris on August 25, 1944. The village erected a monument of four statues of Americans who served with the 90th Infantry Division or attached units: Private Richard E. Richtman (1924-1944), Sergeant Andrew J. Speese (1912-1944), Private First Class Virgil J. Tangborn (1920-1944) and Sergeant Tullio Micaloni (1913-1944). 

Source:
http://www.worldwar2database.com/gallery3/index.php/wwii0142

02 February 2013

Overturned 12. SS-Panzer-Division "Hitlerjugend" Panther Ausf A


Image size: 1600 x 978 pixel. 345 KB
Date: Saturday, 9 June 1945
Place: Norrey-en-Bessin, Normandy, France
Photographer: Unknown

A heavily damaged Panzerkampfwagen V Panther ausf A of the 3.Kompanie/1.Abteilung/SS-Panzer-Regiment 12/12.SS-Panzer-Division "Hitlerjugend" lies flipped over next to the road between Norrey-en-Bessin and Bretteville-l'Orgueilleuse. Note the sign attached that says "remove gearbox." After the failure of the 1st Abteilung's 1st and 4th Companies of the 12th SS Panzer Regiment to seize Bretteville-l'Orgueilleuse on the night of June 8-9, 1944, SS-Oberführer (later SS-Brigadeführer) Kurt "Panzer" Meyer ordered the recently arrived 3rd Company to attack Norrey in a daring daylight armored thrust. Again outpacing their infantry with orders to stop only to fire, the Panthers turned from the Caen-Bayeux Highway into the fields to attack the 1st Battalion, The Regina Rifle Regiment, 3rd Canadian Division. However, expecting the Canadians to open fire with their 6-pounder 57mm (2.24 inch) anti-tank guns and thus turning towards them to put their 80mm frontal armor to the Canadians, the Panthers under Hauptmann Luedemann exposed their side and rear flanks to fire from nine Canadian Shermans of C Squadron, 25th Armored Delivery "Elgin Regiment" who were bringing replacement tanks as reinforcements from Juno Beach. The Elgins' tanks included Sherman Fireflies armed with a 17-pounder 77mm (3 inch) anti-tank gun. Seven Panthers were destroyed; fifteen of thirty-five crewmen were killed; the rest were burned or wounded. As the Panthers withdrew, they were hit by artillery fire from the Canadians and Allied ships offshore. Later, this Panther was overturned by Allied Engineers to remove it from the road. It is often reported that this tank was hit by fighter-bombers; the damage to the hull bottom is the result of tests by the engineers to see what explosives could damage the tank. 

Source:
http://www.worldwar2database.com/gallery3/index.php/wwii0141

12. SS-Panzer-Division "Hitlerjugend" Panther Ausf G


Image size: 1600 x 988 pixel. 737 KB
Date: Tuesday, 20 June 1944
Place: Bretteville-l'Orgueilleuse, Normandy, France
Photographer: Frank L. Dubervill

A Knocked out Panzerkampfwagen Panther ausf G, commanded by Untersturmfuhrer Paul Teichert (born 5 August 1924) from the 4.Kompanie/1.Abteilung/SS-Panzer-Regiment 12/12.SS-Panzer-Division "Hitlerjugend" outside 75 Rue de Bayeux in Bretteville-l'Orgueilleuse. The suspension has failed in the fire and the tank has settled to the ground. On the night of June 8-9, 1944, the 1st Abteilung and the 25th Panzergrenadier Regiment made an attack on the 1st Battalion, The Regina Rifle Regiment, 3rd Canadian Division, with twenty-two panthers under SS-Obersturmbannfuhrer Max Wünsche, two batteries of self-propelled artillery and a motorcycle company led by SS-Oberführer (later SS-Brigadefuhrer) Kurt "Panzer" Meyer. The Reginas had suffered heavy casualties in the landing on Juno Beach on June 6, but with reinforcements moved towards Caen and occupied Bretteville-l'Orgueilleuse, Norrey, and Cardonville; other Canadian units occupied other towns, including Putot. The 12th SS "Hitlerjugend" Division was made up of sixteen- and seventeen-year-old Hitler Youth and commanded by SS-Brigadefuhrer Fritz Witt. Witt received orders to drive the Canadians into the sea. Meyer expected the Canadians to falter under a concentrated armored attack, a successful tactic on the Eastern Front. At 1100 Hours the attack began. Lacking heavy anti-tank weapons, the Reginas had to stop the Panthers with 6-pounder 57mm (2.24 inch) guns and Projector, Infantry, Anti Tank (PIAT), a spigot mortar with a 12 pound (5 kilogram) high explosive anti-tank (HEAT) shaped charge; the 6-pounders and the PIATs could only penetrate the lesser rear armor of the Panthers. The Reginas also had a large quantity of small arms and aummunition. One PIAT team - Rifleman Joseph E. LaPointe, Rifleman Gill A. Carnie and Lance Corporal Clarence V. Hewitt - took up a position 15 yards (14 meters) from the Regina Rifles Headquarters near Bretteville-l'Orgueilleuse's Church. The flaw in Meyer's plan was that his units, having just arrived at the front, lacked coordination with other attacking Hitlerjugend elements; he also sent his Panthers without much infantry down the Rue de Bayeux, allowing the Reginas to deal with them one at a time. The Reginas claimed twelve Panthers were destroyed; Meyer would only later admit to six lost. The Panther in this photo closed to within 30 yards (27 meters) of the Regina's Headquarters at 0000 Hours; LaPointe, exposing himself to the tank's machine gun fire, struck the Panther with repeated PIAT hits. The Panther, attempting to escape, hit an improvised mine of 75 grenades. LaPointe received the Military Medal. A second Panther, seeing the first explode, fired wildly but only struck the first Panther, fracturing the rear of the turret. The crew of the stricken Panther bailed out and were shot down by the Canadians. Meyer was able to reclaim the nearby town of Putot from the Winnepeg Rifles, but the Reginas held Bretteville-l'Orgueilleuse throughout the campaign for Caen. Witt was killed on June 14 in a naval bombardment. 12th SS Panzer Division Hitlerjugend ceased to exist during the Normandy campaign; some 1,500 of their 21,500 officers and men were killed, wounded or captured by September 1! Kurt Meyer was captured on September 6, 1944 and after the war was tried for the war crime of killing thirty-seven Canadian prisoners at the Abbey Ardennes on June 7, the day before the battle for Bretteville-l'Orgueilleuse. Canadians were outraged that he was given only nine years in prison. Max Wünsche was captured on August 20 after driving a German vehicle through the liberated town of St. Lambert. This Panther was the first to be knocked out in ground combat in the Normandy campaign. 

Source:
National Archives of Canada, PA-130149 
http://www.ibiblio.org/hyperwar/UN/Canada/CA/Normandy/Normandy-2.html

25 January 2013

American Soldier Inspects Panther Ausf A


Image size: 1600 x 1060 pixel. 351 KB
Date: Monday, 21 August 1944
Place: Falaise, Calvados Department, Basse-Normandie, France
Photographer: Unknown

A knocked out Panzerkampfwagen V ausf A Panther is investigated by an American soldier. The tank "brewed up" and burned, causing the Zimmerit anti-magnetic paste (to prevent magnetic mines from being attached) to crack and burn off. There were 576 Panthers available to the Germans in Normandy between the landings on June 6 and August 25, 1944. Over 400 were destroyed, mostly by concentrated artillery fire and air attacks. As the remains of the German 7. and 15. Armee were constricted to pass through the area of Falaise in August 1944, fighter-bombers (German: Jager-Bombern or "jabos") of the British Royal Air Force and the Americna 9th Air Force, mostly Hawker Tempests and Typhoons and Republic P-47 Thunderbolts armed with rockets, attacked the retreating Axis columns that were now forced to travel in the open daylight. While thousands of Germans escaped, hundreds of vehicles and artillery pieces and tens of thousands of men were killed. The rockets, while inaccurate, had the firepower of a broadside of a naval cruiser, causing devastating damage. Even the 80mm front hull armor of the Panther, which could not be breached by any Allied main tank gun, would crack under a hit from a airborne rocket. The Allies' air superiority was the chief means of dealing with the Panther; the number of Panthers and their superior armor and firepower took a heavy toll of American tanks. 37% of the Allied Shermans were casualties; the expected loss rate was 7%. The 3rd Armored Division alone lost 1,100 Shermans destroyed or damaged out of service in 1944-1945, a loss rate of 580%. The ausf A made up the majority of Panthers in Normandy. Benefitting from the inauspicious combat debut of the Panther at the Battle of Kursk, the ausf A had a machine gun for defense against infantry, and more reliable mechanics than the ausf D that preceeded it. Still, the Panther required more maintenance than the American Sherman, which also greatly outnumbered it. 6,000 Panthers were produced against 50,000 Shermans and 50,000 T-34s. 

Source:
http://www.worldwar2database.com/gallery3/index.php/wwii0138

21 January 2013

A Destroyed Panzerkampfwagen 35(t) in Poland


Image size: 1600 x 1600 pixel. 513 KB
Date: Monday, 18 September 1939
Place: Poland
Photographer: Unknown

The picture come from a German album, although it depicts a KO'd vehicle. A Pz.Kpfw. 35 (t) a.k.a. Skoda, Lehky Tank-35 brewed up in September 1939, Poland. Note a white cross insignia of the period, painted on the gun mantlet, just to the right of a gun. The photo is an eBay find by Alex Zaretser of "The Armor Journal". There's lots of good photo coverage of the 35's in 1939. Many wrecks as well since they didn't perform well obviously. Incidentally, two Panzer 35's and one Panzer IV KO'd in five minutes on 18 September 1939 by Polish officer aspirant Orlik and his 20 mm armed TKS tankette. Confirmed number of the totally written off Pz.Kpfw. 35 tanks in Speptember 1939 was 77, although Oberst H. Bade in his "Die Bereitstellung des XV AK an der Pilica und Einsatz zwischen Bzura und Warschau, 15-18 September 39, Abfertigungsjahr 1941" mentions a number 89 plus 33 heavily damaged.

Source:
http://www.facebook.com/photo.php?fbid=538764249481383&set=o.303273499761263&type=1&relevant_count=1&ref=nf

17 January 2013

Destroyed Panzerkampfwagen IV Ausf.J in Normandy


Image size: 1600 x 1239 pixel. 521 KB
Date: Thursday, 3 August 1944
Place: Pont-Farcy, Basse-Normandie, France
Photographer: Unknown

In a village left in ruins, a GMC truck passes behind the German medium tank PzKpfw IV Ausf. J of the German 2. Panzer-Division, destroyed by soldiers of the 35th U.S. Infantry Division, August 2, 1944. Looks like knocked out in airstrike or by heavy artillery barrage. Note barrel appears still secured for travel, and also note shattered buildings and wall. this Panzer IV of the 2. Panzer-Division (the three-pronged fork is visible on the frontal shielding side controls) formed part of the 8 Kompanie of Panzer Abteilung II of Panzer-Regiment 3 which blocked circulation with the crossroads of the center of Pont-Farcy, it was pushed back on the other side of the crossroads. Membership of the tank is determined by the tactical sign - yellow trident. The tank can be seen scattered fragments of uniforms, including pants, hanging on the gun. In the background you can see a passing American Sanitary triaxial truck GMC CCKW 353 2.5 ton 6X6 U.S. Army ensuring a medical mission (Red flag Cross). Picture taken during the period from 3 to 5 August 1944. The village is liberated on August 2 by the 35th Infantry Division.

Source:
Conseil Régional de Basse-Normandie / National Archives USA
http://www.archivesnormandie39-45.org/specificPhoto.php?ref=p013049

Destroyed American War Machines Near Bastogne


Image size: 1600 x 1292 pixel. 549 KB
Date: Friday, 29 December 1944
Place: Bastogne, province of Luxembourg, Belgium
Photographer: Unknown

Destroyed American 76 mm Gun Motor Carriage (GMC) M18 Hellcat Tank Destroyer and M3A1 Halftrack in the background, lost to the German artillery fire near Bastogne, 29 December 1944. Even though the Germans pressed their offensive all around Bastogne, they failed to take the city. The Allied forces did not break, and Lieutenant General George S. Patton's Third Army was rushing to relieve Bastogne from the south. Patton told an unbelieving Eisenhower that he could wheel his army 90 degrees and strike north into the bulge with three divisions in only two days. He accomplished this feat in one of most memorable mass maneuvers of that or any war. On 23 December, the weather cleared, freezing the ground and making it passable for armor. Allied planes filled the skies, and transports dropped resupplies to the defenders of Bastogne, then down to only 10 rounds per gun. On Christmas Day, 2nd Armored Division gunners had a "turkey shoot" near the Meuse, destroying 82 German tanks. On 26 December, Lieutenant Colonel Creighton Abrams's 37th Tank Battalion of the 4th Armored Division broke through the German lines, lifting the siege of Bastogne. The battle now expanded as both sides poured in reinforcements. 5. Panzerarmee made Bastogne its principal effort, as the planned German drive on Antwerp turned into a struggle for Bastogne. Meanwhile, the Americans brought up significant amounts of artillery and armor. Allied aircraft also attacked the German armor without letup, destroying large numbers of tanks. The last major German attack on the city occurred on 4 January. Other smaller attacks took place until 8 January, with the battle ending the next day. The fight for the city had claimed about 2,700 American and 3,000 German casualties; Bastogne itself lost 782 Belgian civilians.

Source:
http://www.histomil.com/viewtopic.php?f=335&t=1533&hilit=put&start=730
http://www.historyandtheheadlines.abc-clio.com/ContentPages/ContentPage.aspx?entryId=1145014&currentSection=1130224&productid=3

29 November 2012

Abandoned Jagdtiger of Schwere Panzerjäger-Abteilung 653


Image size: 1600 x 1148 pixel. 581 KB
Date: Tuesday, 17 April 1945
Place: Morsbronn, Alsace, France
Photographer: Unknown

Feldwebel Erich Bonike's destroyed Jagdpanzer (Hunting Tank) VI Jagdtiger (Hunting Tiger) Ausf.B (Sd.Kfz.186, alternate designation 128mm (5.04 inch) PaK44 auf Panzerjäger (Tank Destroyer) Tiger), hull number 305012, identification number 314, from 3.Kompanie/schwere Panzerjäger-Abteilung 653, is examined by an American soldier. Feldwebel Heinz Telgmann's Jagdtiger 332 can be seen in the distant background. Jagdtiger 314 left 653's assembly area at Hollendorf on March 16, 1945, in company with five other Jagdtigers to attack American positions in Morsbronn. 653's commander preferred a night attack to neutralize the threat of "Jabos" - "Jager-Bombern" (fighter bombers) - but the attack was ordered to proceed. On the way to Morsbronn, Jagdtiger 301 was hit by a rocket in the radio compartment, burning radio operator Hans Sager. Jagdtiger 301 Unteroffizier Hans Appel was hit by shrapnel. While approaching Morsbonn, the unit came under heavy fire from 9th Air Force Republic P-47 Thunderbolts and artillery. 314 suffered drive train problems. 314 drove into the ditch you see in this view and was abandoned and blown up by the crew. 332 was hit by rocket fire and abandoned. Hull number 305012 was the last Jagdtiger with the Porsche chassis, one of eleven built. The rest of the 85 built had a Henschel chassis, which was more costly to produce. The Jagdtiger, like 314, often broke down. The entire vehicle had to move to target the main gun, and the constant wear on the transmission and tracks caused many problems that were never solved. Many Jagdtigers were abandoned rather than knocked out. 

Source:
http://www.worldwar2database.com/gallery3/index.php/wwii0071